Home » Uncategorized (Page 17)
Category Archives: Uncategorized
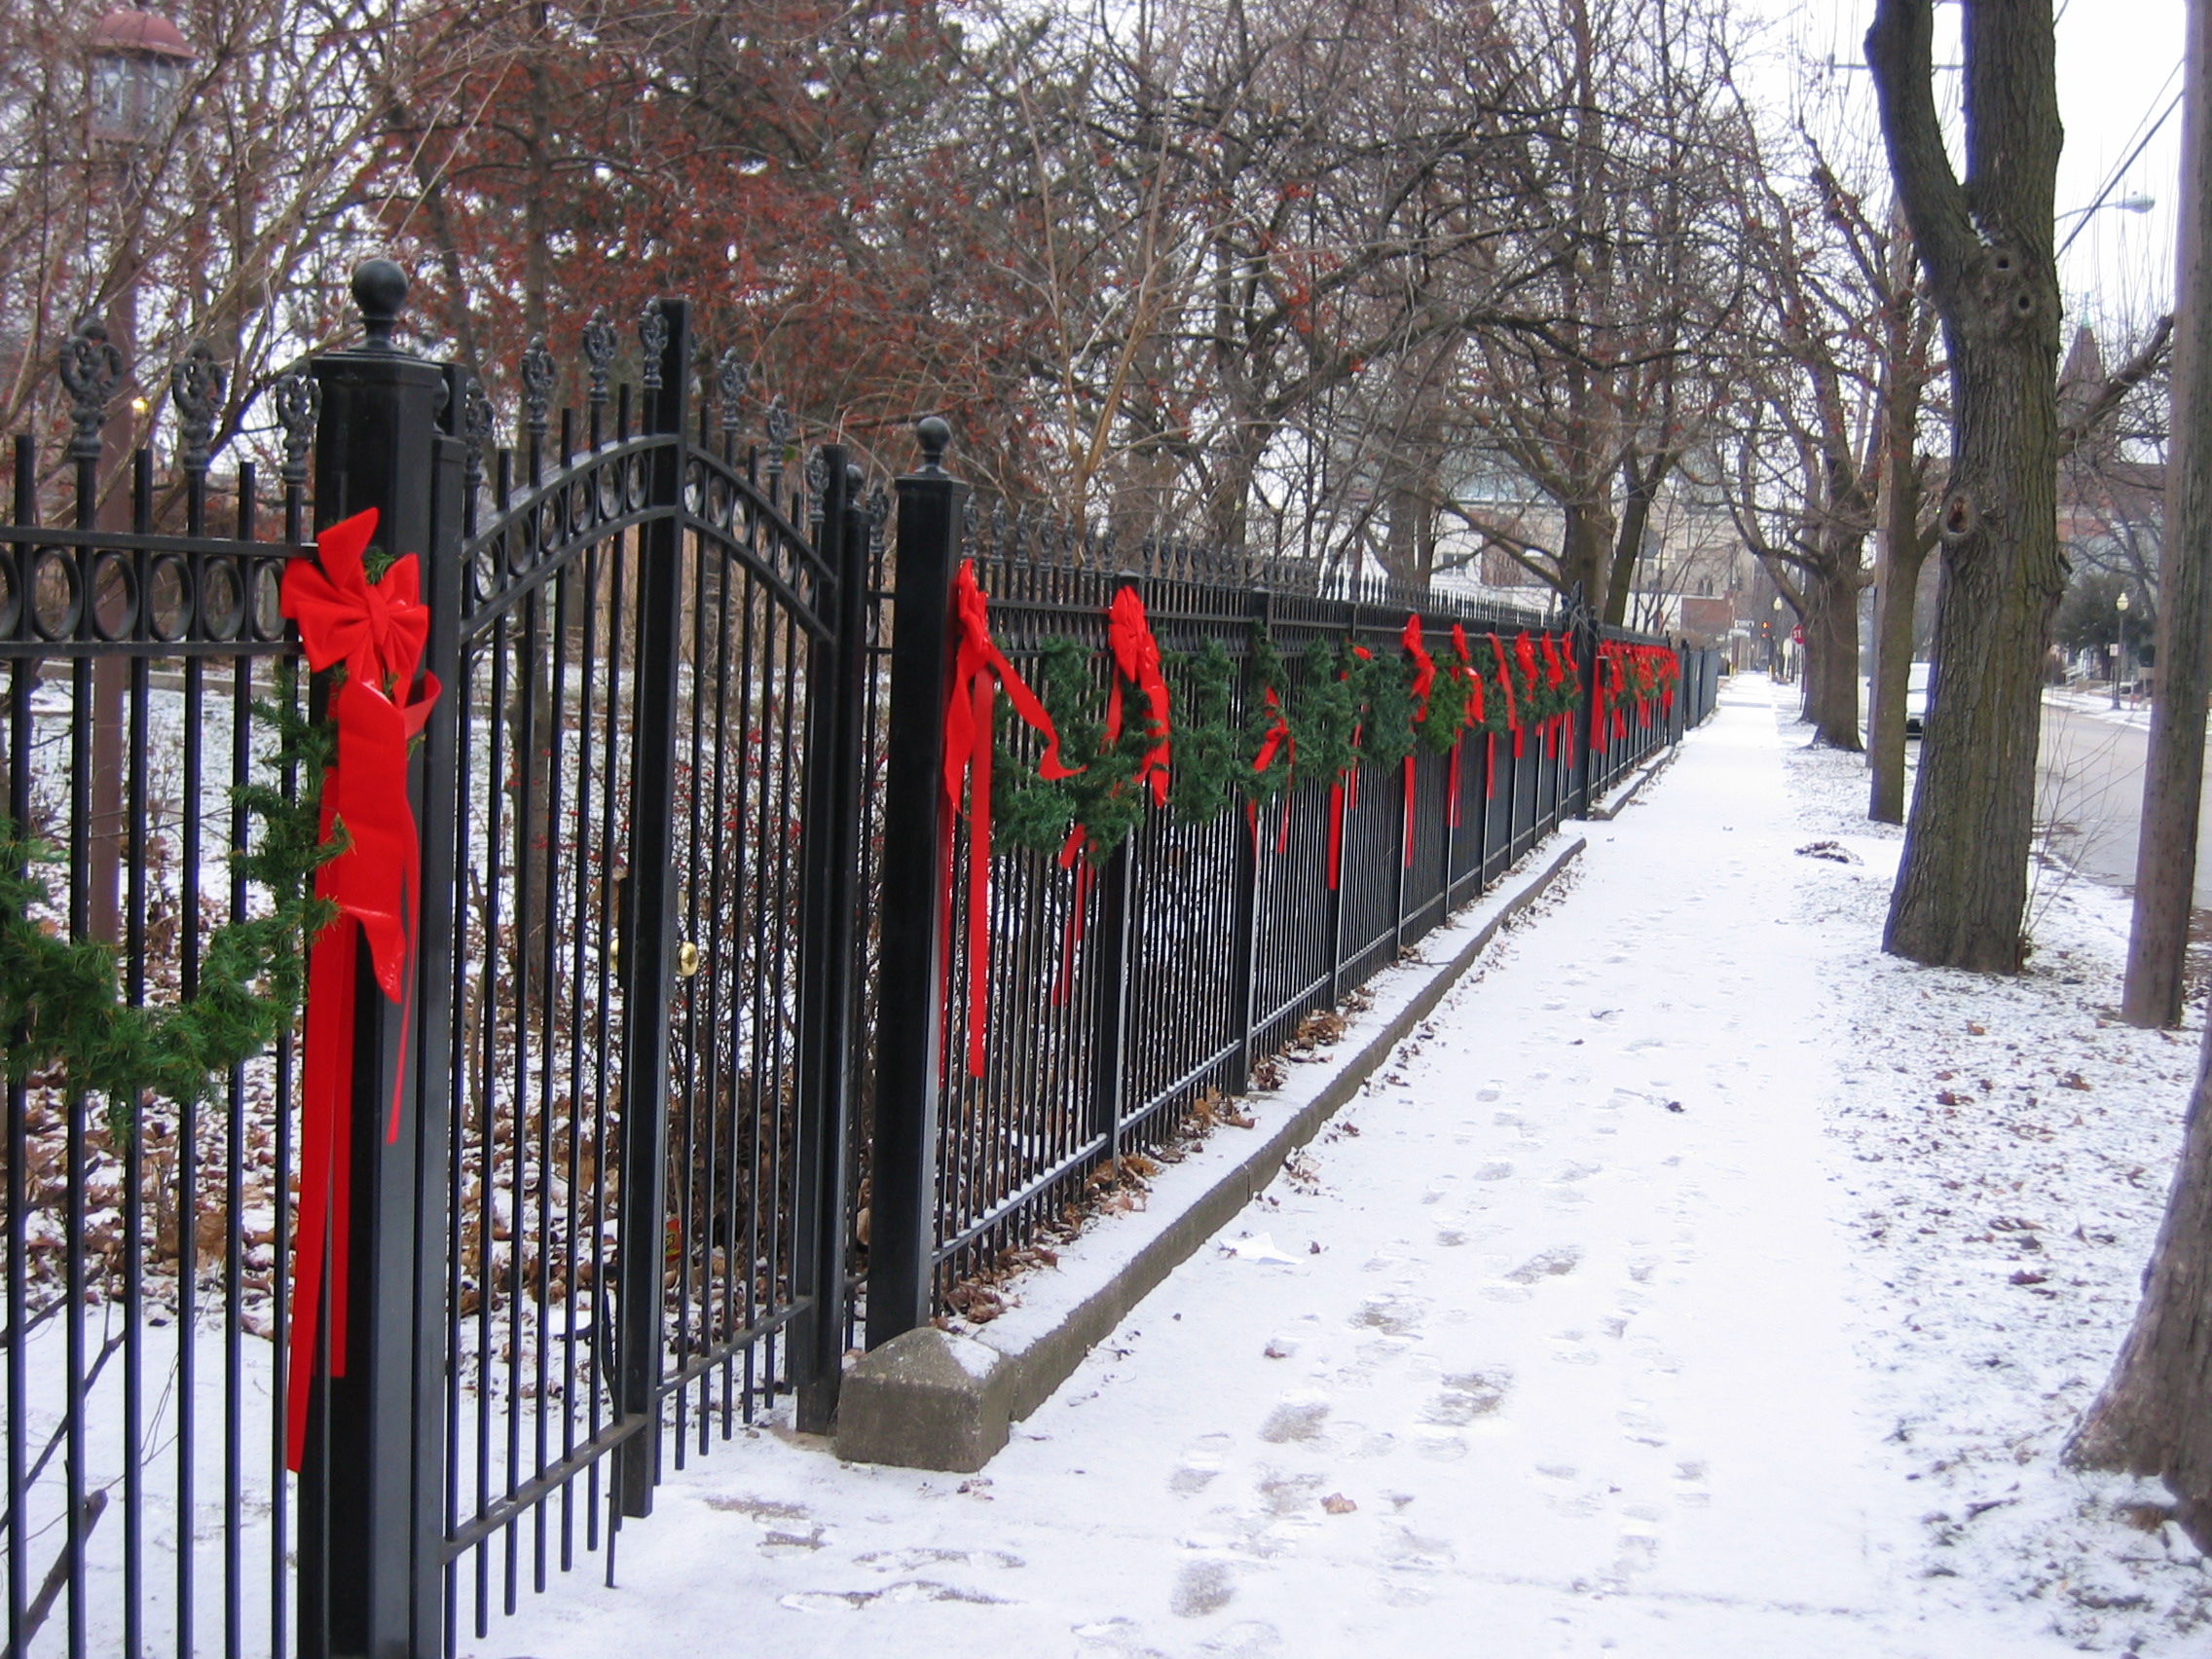
Decking the Halls For The Holidays: Part Three- Decorating the Tree

Ornaments Galore!
I love Christmas trees. Of the fourteen Christmases we’ve spent in this old Victorian house, this year it will probably see the fewest number of Christmas trees– with a total of seven if I stick with my plan. In past years, I’ve put up as many as thirty two trees. One in every window and then some. Sounds a little crazy– okay, a LOT crazy– but it’s something I really enjoy.
You can imagine, with that many trees, you have to be a little creative when it comes to decorating all of them. I thought I’d share some general Christmas tree decorating tips, as well as some of the imaginative solutions I’ve come up with over the years to make them unique.
First off, I can’t say I’ve ever really seen an ugly Christmas tree. (Alright, maybe a couple.) Christmas trees can be a personal and unique statement of who you are. It can also be a nostalgic trip through the past. Especially, if you’re one of those people that collects a few new ornaments each year or has ornaments made for, or by members of your family. Displaying them can be fun but also a challenge.
So let’s get started with some general tips and things to consider when planning to decorate a memorable tree. (I’ll be referring to all tree decorations, generally, as ornaments.)
- Know what you have. Before you start your tree, take a look at the ornaments you’ll be using to refresh your memory. Size, color and quantities of similar ornaments, all play a part in the final outcome of your tree.
- Start with an idea. Is there a theme to your tree? Will it be certain colors or highlight certain shapes or ornament styles? You may want to add to subtract certain ornaments from your plan if you have a vision for the final look.
- What element(s) will be your constant to achieve your theme or idea? Several dozen ornaments of a specific color or style? Depending on the size of your tree, you’ll want to make sure you have enough to establish your design element covering the tree.
- Are you decorating the tree by yourself or will this be a family activity? If you want your tree to have a certain overall look and decorating it is going to be a family affair… you may want to pre-decorate with your base ornaments (or design element) before letting the family go to town with the rest. It’s also a good idea to keep fragile ornaments out of the hands of small children.
Example- You have may have lots of unique family ornaments but you want your theme to be red. In order to make sure your tree has an even balance of red ornaments, you may want to space them throughout and then let the family add all the rest.
- Ornaments don’t have to be expensive or necessarily holiday-related if they help achieve your look. Just make sure you have enough ornaments that will specifically carry your theme.
- If you want to highlight or feature a collection of special ornaments– you will probably want to adopt the less is more philosophy or else your special ornaments are likely to get lost.
- Make sure you balance the weight of your heavier ornaments on the sturdier branches and all around the tree. Too much weight on one side can make your tree tip over! Larger, heavier ornaments being concentrated towards the bottom is fine but you should still have a sprinkling throughout as you move towards the top.
- Be creative and be flexible. Don’t be afraid to add another color or style if, through the process, you discover you need something more. There is no wrong or right look– it’s your tree!
Christmas Tree Themes

Mercury glass ornament tree, accented with berry picks.
I’ve done many different themed trees over the years including Victorian trees, floral trees, mercury glass ornament trees, Santa and angel-themed trees, color based trees… Yes, even Beanie Baby trees. I know friends that do sports, hobby, Disney and occupation-themed trees as well. The possibilities are endless here. To be successful, you’ll need to have enough ornaments representing your theme– to stand out and cover your tree in balanced proportions.
Example- If you want to decorate a snowflake tree but you only have four snowflake ornaments, your theme isn’t going to be obvious. Even a dozen or so ornaments of a specific kind, can get lost on your tree if the other elements over power them.
I love mercury glass ornaments. Really nice ones can be quite expensive and I only add a few new ones each year. In order to fill out my themed tree, I’ve added other types of ornaments like painted glass, to be able to fully decorate my tree but still stick to my theme. I also add floral berry picks that add color and fill space without overpowering my featured ornaments.
Stuffing and Filling Your Tree

Try ‘stuffing’ the branches to fill gaps in large trees.
Large trees present a number of challenges including the spacing of the branches. Lower branches are frequently farther apart and if you don’t address them, can leave larger empty spaces that ornaments can’t always fill. A few years back, I adopted a method I call stuffing the tree to help solve that problem. This fills the void between branches and gives the tree a fuller look.
One of my favorite ways to stuff a tree is to use floral bunches or bouquets. The first step in decorating my tree is to stuff the voids with the bouquets, deeper in the tree. Spacing is still important. I try to fill the largest spaces first, while still spacing the bouquets throughout the tree for balance, which means also adding them where they may not be needed to fill a hole but are needs to give the tree a consistent look.
Another great inexpensive stuffing is netting or tulle. I cut or tear random-sized pieces and bunch them, stuffing the interior of the tree. It’s easy to use and manipulate between the branches, adding a soft effect to the overall look. This also might be a good solution for someone considering a flocked or specific colored tinsel tree. Tulle is available in a rainbow of colors and it’s not permanent so you could change the color of your tree every year, if you wanted– without breaking the bank.
I’ve also used pinecones, raffia and other everyday greenery to give a fuller, more natural effect.
NOTE: If your tree is especially thin, you may want to stuff your tree before you add the lights.
Though stuffing your tree may not add to your initial design or theme, it does play an important part in the final outcome. It can be subtle or dramatic, depending on what you use and how much of it.
Decorating Your Family Ornament or ‘Everything’ Tree

Family tree with only the ornaments creating the base. design element.
Since I decided to put up fewer trees this year, that leaves me with an abundance of ornaments to either use or put away.
I decided I wanted to use as many of my favorites as possible but still wanted to have a relatively designed look. Here was my solution.
This might help what many people will find they are facing when decorating the typical family Christmas tree.
- I gathered together some red and white ornaments, threw in a few silver ones and used them as my base colors. I inherited a collection of gold laser-cut ornaments (Danbury Mint) that I added next. I could have stopped right there and my tree was looking great. All the ornaments were spaced out with color, shape and style– balanced throughout the tree.
- Next I added all those favorite ornaments I love, again, paying attention to spacing. Always make sure that you don’t let one area get too heavy or unbalanced (too many, too grouped together.)
- I took a step back and made sure my tree still had a good balance of color, shape, etc. Moving a few ornaments, as necessary.
- I finished the tree, accessorizing it with berry floral picks as the finishing touch.

The finished family tree.
One of the main reasons I use a lot of floral picks in my trees is that it really helps to blend the overall tree. If you prefer a cleaner or more dramatic look, use picks sparingly or not at all.
Tree Garland or “Who Tied Up Your Tree?”
The use of garland on your tree can make or break your final designed look. Garland isn’t the easiest thing to use. I’ve seen too many trees that look like they were tied up and being held hostage as opposed to adding to the tree’s design element.
Christmas tree garland can take many forms. You rarely see the traditional popcorn and cranberry garland anymore– and personally, I’ve never had any luck stringing it together successfully. There are the metallic tinsel garlands (thick and thin), bead garlands, floral garlands, even grape vine and rafia can be used.
Do you drape the garland around the tree? In a spiral? Hang it Vertically? Do you swag it? All choices you can make depending on your skill and taste. Keep in mind that the way you hang the garland on your tree will also affect the quantity you will need.

My 7 ft. ‘natural’ tree with grapevine garland.
You can add garland at any point in the decorating process but I prefer to add it first, if at all. When you wait until the end, moving and re-spacing the garland to get it just right can tangle with your ornaments and cause a big mess. You would also have to move a number of ornaments that would be hidden behind the garland. Adding it first allows you to adjust it until it’s just right, before hanging all your precious ornaments.
Christmas Trees and Pets (Children Too!)
You want to make sure you protect your loved ones, whether thay have two tiny feet or four furry paws.
- Cats climb trees! They also like to bat their paws at dangling ornaments. I’ve know more than one person that has come home to find a toppled tree due to a kitty-climber. Make sure your tree is weighted properly and keep an eye out for felines that show too much interest in your tree.
- Ornaments are not dog toys… or are they? My Boxers, even at ten years old, pull ornaments off my tree. I have to keep watch to make sure they leave them alone. It doesn’t matter whether they are round (like a tennis ball), plastic or stuffed (like a chew toy), or long (like a stick)– they all look like toys to them. Dogs being dogs, will chew and possibly swallow even glass ornaments so take precautions to avoid that emergency trip to the vet.
- The rules that apply to toys with small parts should apply to your Christmas decorations. Try to avoid sharp or small ornaments that might be swallowed. Keep the more fragile ornaments out of reach. By all means, supervise small children around your Christmas tree. As hard as you try, no tree is completely childproof, so be safe!
Finally, a word about our foyer tree. We had talked about eliminating many of our other trees and getting one tall tree that would climb through the stairwell from our foyer to the second floor. I decided to experiment this year and found I could combine tree sections from two of our 12 ft. trees and created a 20 ft. tree! The poles of the trees were the same size allowing them to be interchangeable. By bending and manipulating some of the branches, I was able to combine them pretty convincingly.
Best Tip of the Day: With a little thought and creativity– and a focus on color and balance– you can create your most beautiful Christmas tree ever!
Victorian Foyer Tree. I created this 20 ft tree from two 12 ft trees we already owned.

Next Up: Tabletop Centerpieces
Decking the Halls For The Holidays: Part Two- Selecting and Prepping Your Christmas Tree
Live or Artificial… Large or Small… I hope you’ll find some tips here to take a little stress and frustration out of prepping your Christmas tree this year. I highly recommend adults setting up and prepping the tree prior to having young ones participate in the actual decorating.
Choosing Your Tree
There are many things to consider when selecting a new Christmas tree that rely heavily on your own personal taste and the space where it will be displayed. Height , color, fullness and shape are all considerations… pre-lit or not? There are also safety issues to consider, and things you can look for to anticipate the longevity of your tree.
 Live or Artificial? For some a matter of taste, could be a cost or storage issue and for others a necessary tradition.
Live Trees- Benefits include: scent, natural and no storage concerns. I have friends that always insist on using a live Christmas tree. Part of their holiday tradition is going out and cutting their own. Very nostalgic. For those that don’t have that luxury, you are likely purchasing a tree that was cut and stored in a refrigerated truck back in August. No wonder there is often little scent and the needles barely make it past Christmas Eve! I’m not going to say a lot here, there is a lot of information online about things to consider and to watch out for when selecting a healthy, safe, live Christmas tree. Remember, the cost does not indicate the freshness!
Artificial Trees– The possibilities here are endless. Height, color, fullness, thick or thin… it’s out there if you look hard enough. Benefits include: Reusable, many are made from recycled materials, more cost effective over time and they are considered safer to display than live trees.
Best Tip of the Day: Strapped for Cash? Did you know there are lots of people giving away trees on Craigslist.com?
There are affordable options out there but artificial Christmas trees can be quite expensive. Remember no tree is perfect, live or artificial. Here are a few things to consider when purchasing a new artificial tree:
- Fullness and strength of branches. When buying a tree online it’s really difficult to check the quality and details. You want sturdy branches that have lots of tips for a full look.
- Check the tips for needle drops. Better quality trees tend to hold their needles because of how they are manufactured. Cup the tip (a finger of the branch) and run your hand back and forth on it. You should little or no needles fall off on a new, good quality tree. Overtime, of course, the needles will become more fragile. I have one tree that is 10 years old and it is so well made, the only way I can get any needles to fall off is to pluck them off.
- Pre-Lit or Not? Personally, I prefer a tree that is not pre-lit. Even though the lights are hidden in the branches and it makes it easier to prep the tree, the light will inevitably stop working. Finding that one missing bulb or short in the wire in nearly impossible. Removing the lights if they stop working can be difficult but you can always add strings of lights to the tree if they do stop working. NOTE: Pre-lit trees can be very, very heavy. Something to consider for moving and storage.
- Branches. Check to see if the branches are individual and have to be added one by one or if the branches are all hinged to the pole. A tree with individual branches can be stored easier if space is an issue. You have to be careful because the plastic fittings where the branches attach to the pole can crack if there is too much weight or force on the branch. The plastic also becomes more brittle over time causing breakage.
- Collapsible Pop Up Trees? They do exist! I’ve seen them in traditional evergreen styles and collapsible tinsel garland trees, that seem to be in most of the stores this year. These aren’t usually very full and most can’t hold many or even any ornaments. They are easy to set up and to store but I wouldn’t expect that these would last more than a year or two.
- As always, shop after Christmas to get your best bargains. Every tree I’ve used for the past 15 years was purchased after Christmas for 70-90% off!
Prepping Your Tree
Decorating your Christmas tree is the fun part. No one looks forward to setting up and prepping the tree, which for me, starts when I take it out of the box, through adding the lights.
Tree Stands. Whether you are using a live or artificial tree, it’s very important to have a good, strong tree stand that is the right size for your tree. It’s also probably a good idea to make sure your live tree stand can hold plenty of water. Most artificial trees come with stands appropriate for that tree. In rare cases, I’ve had to find a better stand so the tree would stand safely and securely in place. If you are reusing an old tree and have had tipping issues– you need a better stand.

Before
Fluffing the Branches. This obviously only applies to artificial trees. Once your tree is out of the box and assembled in its stand, you need to fluff out all the branches before you add any lights or ornaments. I highly recommend wearing a cheap pair of work gloves during this process to avoid scratches and skin irritation.
Start at the bottom of the tree and work your way around and then up, fanning the tips on every branch as you go so they aren’t laying flat and clumped together. This accomplishes two things:

After
1) It makes the tree appear to be much fuller; and 2) It will actually help stabilize and support the surrounding branches.
(If the tree still looks thin or sparse, I’ll cover what you can do to add fullness in the next blog post– and this works for both artificial and live trees.)
Now you are ready for the lights.
Lighting Your Tree.
Stringing your lights on the tree can be one of the most frustrating parts about decorating. I’ll talk about the different types available in a minute– but here are some things to consider when actually lighting the tree: If you prefer a more sparse or uniformly decorated tree, then you want to try have your lights evenly spaced without holes or dark spots in your tree. If you use a lot of decorations, you don’t have to be as concerned with this as some of the decorations are inevitably going to block some of the lights anyway.
I find to get the best coverage, you should move around the tree completely, all in one direction. Save a few strings of lights to fill any troublesome dark spots once this step is complete. I personally prefer to to move around the tree in circles, from the bottom moving up in a slow spiral (horizonally) instead of stringing the lights up and down (vertically) on the tree. I have tried winding lights around the branches to help hide the strings, only to find: a) it’s very time consuming; b) you need a lot more lights; and c) you still end up needing to run additional strings around the tree to fill the dark spots. After I run the lights completely around the tree, I’ll take my extra strings and move around the tree diagonally, to hit the dark spots and to try and avoid creating a noticeable light pattern.
 Light Types.
LED lights are the newest technology and also the most costly to purchase. The good news is that after a few years, the energy savings will outweigh the initial investment. If you are purchasing white, pay attention whether you are getting cool or warm white. There is a definite difference and you’ll want to avoid accidentally buying both. I’m in the process of switching over to LED lights completely. One of the best things about LED lights is that you can connect up to 40 strings together end to end, eliminating a lot of extra outlets and cords.
Mini lights make up the bulk of what most people currently use today. They can still have different covers or shapes but if you use different styles on the same tree. Make sure you spread out each type evenly or you will likely be disappointed with the result. Most mini lights can be connected end to end with a maximum of 3 strings without blowing fuses on the plugs. Mini lights are currently the most affordable and come in the largest variety of colors and styles.
C-Series lights should not be used indoors, period. These are the larger old fashioned bulbs. They are still available but designated for outdoor use only. They can get extremely hot and become a fire hazard, particularly on live trees. I will admit that I have used them on an artificial tree in the past… and they melted the needles on the branches that they were touching.
Multifunction Mini or LED lights. If you want twinkling lights, flashing or fading these are the ones you want. If you use these, you need to run them around your tree more random than uniform and overlap them to get the desired effect. One of the drawbacks is that they cannot be connected end to end and must each be plugged in separately.
White, Colored Lights or Both?.
Completely based on your individual taste, adding colored lights to your tree can create several things you’ll want to watch for. If you use all one color or use the multicolored strings, you should be fine. If you mix colored strings of lights, you need to make sure you evenly distribute the different colors evenly throughout the tree. If you don’t, you could end up with unwanted patches or blotches or color.
The other day I notice one store selling trendy pink, lime green and lavender lights (the wire was colored too.) If you decide to go with something trendy, keep in mind the cost, longevity of the trend and by all means, make sure you purchase enough to finish the job. Keep in mind that 6 strings may work this year but next year you may need 8 and they are no longer available. Then what? Back to the drawing board.
AND, make sure the lights you are purchasing are green wire and not white wire! You may need to look in the box to be sure. White wire strings of lights are very difficult, if not impossible to hide on a traditional green tree.
Now you’re finally ready to decorate!
After you have all your lights on the tree, you might want to take a moment to vacuum up any dropped needles so they don’t get tracked all over the house, especially if your family will be decorating the tree together.
One Last Thought– Say NO to Canned Snow!! The only situation where this might be a good idea would be a live tree. If you do, try and spray it outdoors or take careful precautions to protect furniture and walls if you must spray the tree indoors. Never spray canned snow on an artificial tree unless you plan on throwing it out after that use. And please, please, PLEASE… only spray a tree BEFORE you add lights or ornaments. The spray will ruin them for future use. If you want the snow effect on your tree, buy a flocked tree. They are some other options that I’ll share with you in the next installment.
If you have any questions or comments, please contact me! I’d be happy to help.
Next Up: Decorating Your Tree– To Stuff or Not to Stuff?
Decking The Halls For The Holidays: Part One- Getting Ready
I thought I’d share a series of posts on one of my favorite pastimes: Decorating for the Holidays. From trees to garlands to centerpieces– for some, decorating can be a daunting task. Whether you’re a novice or a pro, and whether you love or dread decorating, I hope you’ll find a few of my suggestions helpful as you begin adding a little magic to your home.
 Here we are, one week before Thanksgiving and if you haven’t already, its time to start thinking about decking the halls. I want to start with a few tips that might help spark some creativity before you either haul out the old decorations stored in the attic or hit the stores in search of the perfect holiday items.
Most important: Let your creative juices flow! Don’t be afraid to think outside the box. Express Yourself!
Best Tip of the Day: Use Ribbon and Picks & Stems* to hide imperfections and add the finishing touches to your holiday decor.
Five Things to Consider Before You Start:
1. Cost– It might be a good idea to have a budget of how much you want, or can afford to invest in your decorating. It’s very easy to spend more than you intend if you don’t nail down an amount as you start your planning.
Do a little research before you buy anything. What may seem like a simple idea could end up costing you a lot more than you anticipated. Ten ornaments are not going to decorate your whole tree and three strings of lights aren’t going to be bright enough. Be prepared to purchase more than you originally thought you’d need or have a backup plan if you run out.
You can save a lot of money on future decorating by shopping the after Christmas sales where you can usually save 70-90% off retail. In recent years, a lot of retailers are marking down decorations by 50% a week or two before the holidays just to clear the shelves.
Some stores have sales running now. If you wait until after Thanksgiving weekend, you are probably going to pay premium prices. AND– the longer you wait, the smaller the selection.
 For the Christmas Fanatic— Keep your eyes open year round for items that might be used seasonally. I’ve found lots of end-of-season clearance bargains where I can find large quantities of items for pennies on the dollar. I have a Victorian house so it’s easy for me to incorporate spring, wedding, and other specific floral bunches and floral picks & stems* into my holiday decorating. I also have at least one Christmas tree that I decorate with a natural or woodsy theme, making many fall clearance items a perfect addition.
2. Storage– Be realistic about how much space you have for storage. Many holiday decorations are fragile and require careful packaging and storage which takes up even more space. Christmas trees take up a lot of space. I know a lot of city apartment dwellers still prefer buying live over investing in an artificial tree because of limited storage space.
3. Time & Space– Decorating can be time consuming. It can also be very relaxing way to spend your free time if you aren’t in a rush. If this is your first year decorating or you are trying something new– allow for more time. I suggest taking the time to get organized and sort out what you have before you actually start decorating. I always find I’m missing a box or have less of something than I remembered. There’s nothing worse than getting deep into a project and discovering you don’t have enough to finish. When computing your time equation, don’t forget the time you’ll need to take it all down after the holidays are over and store it away.
You can do wonderful things in a smaller space if you put some thought into it. A small tabletop tree in a loft can be as equally effective as a 10 foot tree in a larger home. A few small additions to your space can do wonders to create that holiday atmosphere.
 4. Theme– Are you going to have an individual room theme or overall theme to your decorating? A color theme, perhaps? Themes are great but can be limiting, especially if you are on a tight budget. Keep in mind that trendy styles and colors might not satisfy you in future years. Consider what will work best with your year-round decor and lifestyle first.
When considering color, remember green ornaments don’t stand out on a green tree. Also, colored lights can be a challenge. I found years when simple red or green Christmas lights were impossible to find! Make sure you have enough before you start!
5. Purpose or Repurpose– As much as I love new decorations, I find it’s more fun to find new uses for old ones. There are elements of my decorating that stay the same from year to year and others that I always change, at least make alterations. I often use items in my holiday design that aren’t specifically intended for Christmas decorating.
Try to incorporate items you already have into your holiday look. The everyday items on your mantle or table don’t necessarily have to disappear until January. Unless you want something completely different, try adding a little garland, artificial poinsettias, a few ornaments… and you can achieve the same festive look.
Holiday decorations that may start to look tired and worn and don’t stand up well on their own, may still work perfectly as part of a larger grouping or display.
Keep in mind that effective Holiday Decorating does not necessarily mean you need to completely transform your space into something different. Try simple accessories and you may be able to achieve the same results. No matter how elaborate your decorating plan becomes, don’t let it become so overwhelming that you aren’t able to take the time to relax and enjoy the beautiful atmosphere you’ve worked so hard to create.
*Picks & Stems– Artificial flowers, berries, fruit and baubles used to accent floral arrangement.
Next Up: Selecting and Prepping Your Christmas Tree
Workplace Survival: 12 Rules To Protect Yourself
I finally broke down this morning and filed for unemployment. It’s been three months since I was notified that my contract would not be renewed and I had hoped I would have secured a new job by now. I have some good prospects but for now, the search goes on.
I promised in an earlier blog to talk a little bit about what led up to my release. I’ve waited until now because I didn’t want my words to be fueled by hurt or anger. I finally decided I would rather do it in a positive way and give some advice that might help others who find themselves in similar situations.
Here are my 12 suggestions that might help you survive in the workplace:
Rule #1 Don’t be too good at your job or know too much.
Rule #2 When a superior says, “Don’t Worry” — watch out.
Rule #3 Climbers don’t look down. They don’t have time for you.
Rule #4 Open Door policies can get one slammed in your face.
Rule #5 Keep records and be able to account for everything.
Rule #6 Never feel that your job is secure.
Rule #7 Change isn’t always good but don’t fight it.
Rule #8 Learn to deal with incompetence.
Rule #9 Don’t expect to be treated fairly. Even good people behave badly.
Rule #10 Right doesn’t always win.
Rule #11 Don’t expect rewards for loyalty.
Rule #12 Rules (and policies) are made to be broken (and will be).
Bonus– Rule #13 Work to live, don’t live to work.
Holding a job and being successful at it, isn’t about showing up on time and doing what is expected of you. It’s not about your education or knowledge and expertise. It’s not about your dedication or going the extra mile. Those are all givens. To be successful, you have to be constantly aware of two things: company politics and money. You have to keep your eyes open and your ears to the ground if you want stay aware of what’s really going on behind the scenes.
You, as an employee, are expendable. Simple as that. What makes you important is how you fit into the political and social climate of the workplace and what impact you have on the bottom line.
— I’ll address and explain this set of rules, my experiences and their importance in future blog posts.
Today I do want to explore my Bonus Rule– and I know you’ve heard it before:
RULE #13 WORK TO LIVE, DON’T LIVE TO WORK
It sounds simple enough and yet it is probably the hardest rule to follow. I have always struggled with this, even with jobs that weren’t necessarily in my main field of interest. It is too easy for many of us, to become so vested in our jobs that it’s hard to let it go when we punch out at the end of the day. Unless you own your own business– and even then, you have prioritize what is really important– living a good life and hopefully, sharing it with other people.
Why do we work? To pay bills, provide for families, plan for the future… to live.
Remember that the business doesn’t care about you. Unfortunately, in many cases, neither do employers. You may think they do– but if you step back and look at it clearly, you’ll realize you are there to perform a specific function. You are only one small ingredient in the recipe of success. Being responsible and taking ownership in your job is a wonderful thing. You have to learn to set limits. This is especially difficult when you are doing something you love. When work becomes the only thing, it’s probably time to move on.
I personally have lost years of friendships, family gathering and missed opportunities to experience and enjoy life– either from the necessities of the jobs I’ve held, or by my own drive. You can’t buy back that time.
You may find it necessary to put work first— but at what cost?
That is the most important question.
I Am the Captain of My Soul
 I was having a conversation with my parents today that bounced from life to travel and politics to education. We don’t talk on the phone often but when we do, we’re usually all over the map as we catch up and try to solve all the world’s problems. After I hung up (Do we still say that with cell phones?), this phrase popped in my head:
I am the master of my fate,
I am the captain of my soul.
My fourth grade teacher, Mr. Hill made my class learn the whole poem and recite it, day after day, in class until we all had it memorized and could repeat it by memory on our own. It was the first thing I can recall being asked to memorize and I spent hours at home reciting it from the tattered mimeographed page we’d been given.
Before I looked it up, besides the above phrase, all I could remember was something about a gate and the line, ‘black as the pit from pole to pole’. I’m not even sure I ever knew the title of the poem until now. I just remember Mr. Hill telling us we should live our lives by this. That, we were in charge of our lives and responsible for how we lived.
Mr. Hill was a big, strong African American man teaching elementary school in Florida in the 1970s. I’m sure that, in itself, had its challenges. His larger-than-life presence was enough to scare us at that age and he was the only male teacher I had until middle school. He was both nurturing and warm but he had the ability to scare the bejesus out of you with his intensity. He was also one of the best teachers I had in all my years of public schooling.
I remember he loved math. He taught us well — not to memorize numbers and equations but to understand how and why the equations worked. He made us all feel, no matter how much we struggled, that we could all learn. We were all individuals and our feelings and our experiences mattered. He never treated us like a bunch of bothersome kids he was stuck with for an entire year.
Mr. Hill taught us our subjects and he also related them to life. Which bring me back to the poem.
The poem is William Ernest Hensley’s Invictus. As it turns out, it is not only considered to be one of the best poems ever written by many, it is also considered highly controversial in some circles.
Invictus
Out of the night that covers me,
Black as the Pit from pole to pole,
I thank whatever gods may be
For my unconquerable soul.In the fell clutch of circumstance
I have not winced nor cried aloud.
Under the bludgeonings of chance
My head is bloody, but unbowed.Beyond this place of wrath and tears
Looms but the Horror of the shade,
And yet the menace of the years
Finds, and shall find, me unafraid.It matters not how strait the gate,
How charged with punishments the scroll.
I am the master of my fate:
I am the captain of my soul.— William Ernest Hensley
Choosing that poem for fourth graders, is pretty extraordinary by today’s standards. Even though I didn’t understand the whole poem then as I am able to do today, I did understand that last phrase. It has popped into my thoughts repeatedly throughout my life.
Today, we undervalue the importance of true learning in the classroom. Students aren’t taught how to think. We undervalue great teachers that go beyond the rigid curriculum to teach students morals and responsibility. Most of them are gone now.
Today we simply medicate unruly kids that need focus and guidance. We discourage the question why — or any original thought. Individuality is frowned upon. Just do it has replaced how and why we do it. We aren’t relating studies to real life. We definitely aren’t nurturing life-long learners.
That’s not education.
I guess I was lucky.
September 11, 2013 : Twelve Years Later
I didn’t wave any flags this year or post any inspiring patriotic posts on Facebook or Twitter. In fact, for the most part, I tried to avoid social and new media coverage. It’s twelve years after the 9/11 attacks that claimed the lives of nearly 3,000 innocent people and the images of that day — the feelings of loss and mourning — are still fresh in my mind.
Instead of letting others tell me how I should feel, remember or memorialize those events, I chose to grieve privately. I chose to focus on the memories of the lives that were lost, the families that were broken apart and the heroes that will not live to see another day.
I chose to remember the husbands, wives and children whose lives have been forever altered by that single moment in time– loved ones suddenly stolen from them. Their lives will never be the same — our world will never be the same.
In the days leading up to this anniversary, I heard people suggest that maybe it was time to move on. Tell that to families. Yes, it’s true that life goes on, must go on… but to suggest that we can, or should, put that day behind us, is not only insensitive but also ignorant and disrespectful.
History repeats itself when we choose to forget.
Last January, I was privileged to accompany a group of students to New York City and that visit included a visit to the 9/11 Memorial. A handful of those students had been in my play, September’s Heroes, a docu-drama surrounding the events of 9/11 in the fall of 2011. Even though we spent two months working, researching and then performing the play– I think it was still somewhat distant to them.
Visiting the 9/11 Memorial brought that all together.
Standing on that hallowed ground, realizing that the two massive pools were the footprints of where those two towers once stood and reading the names etched around those pools made it real for them. It was emotional. It was extremely emotional for me, seeing that link come together. It brought history to life for them– a moment in time that they were almost too young to remember.
There are now school-aged children who weren’t even born when those towers fell. They need to know what happened.
They need to know why we are talking about our rights to privacy, why there’s an ongoing war on terror and why they have to remove their shoes at airports. They need to know.
We are the memory of those that were lost. We are the link to that moment in history that has led to significant changes in all our lives.
We are the storytellers.
Broadway On The High Seas 3: Starry Nights
Patti, Howard, Norm and Seth… and for an unexpected added bonus– Willie. First-names only. That’s what this cruise was all about, right?

(Photo courtesy of Judy Perl Worldwide Travel.)
As if traveling in style and experiencing exotic locations wasn’t enough, we got to rub elbows with– and be entertained by– some of Broadway’s very best talent: Patti LuPone, Howard McGillin, Norm Lewis. and arguably, the hardest working man in show biz, Seth Rudetsky. What a surprise to have Willie Aames as our wonderful cruise director! I certainly don’t want to leave out the brilliant composer and musical director, Joseph Thalken, who was the iciing on the cake. What a line up!
Playbill, under the guidance of President & Publisher, Phil Birsh and Editor in Chief, Blake Ross; with the invaluable assistance of Judy Perl Worldwide Travel created a non-stop, thrill-a-minute dream vacation that we’ll talk about for years. Broadway On The High Seas 3 was a hit!
On top of our daily excursions, we had all the special Playbill entertainment keeping us busy, which is one of the reasons Michael and I barely got four hours sleep a night. But who could sleep!?! We were too busy having fun!
Shortly after we sailed on the first day, Playbill sponsored a Meet and Greet in the Constellation Theater. Of course, everyone was looking around to see if they could spot the Broadway folks. We immediately made some new friends and were busy chatting as they were about to start the welcome and introductions. In walks Patti and her husband, Matt… and they sat right in front of us.
Now, I’m as starstruck as the next person. But, I also believe that ‘stars’ are regular people and deserve respect and privacy just like the rest of us. So even though I’d daydreamed for months about sitting and chatting with Patti for hours in the ship’s lounge (which sadly, didn’t happen)… and even though I could reach out and touch her… I didn’t approach her then. We did run in to her on the deck a few nights later and exchanged greetings and I was satisfied with that. If we were going to talk, I wanted it to happen organically. Besides, I probably would have made a fool out of myself anyway because I would have gushed… and gushed… and well, you get the picture. For me, Patti LuPone is one of Broadway’s greatest treasures and a true artist that completely embodies her craft. I know it’s cliche but it was an honor just to be in the same room with her.

Judy Perl and Blake Ross made this all happen. (Photo courtesy of Judy Perl Worldwide Travel.)
After introductions of the staff and entertainers, everyone went back to socializing and I took the opportunity to introduce myself to Blake (the editor at Playbill), and thank her for allowing high schools to use the Playbill cover for their show programs. (We used it for Joseph this past April.) This got us talking and she introduced us to Phil ( the president of Playbill) and we chatted about the exciting things Playbill is doing to expand its reach. It was really nice making those connections– and I have to say, Blake totally reminds me of Carrie Bradshaw in SITC. She’s adorable.
We also met our travel agent, Judy Perl and her husband and had the chance to thank her in person for setting everything up for us. If you haven’t been following the blog, Judy set up a private tour of Stutthof for us– and then her family joined us on the tour which was really nice. I’m looking forward to working with her great company when we travel in the future.
The second night was Patti LuPone’s big concert. It doesn’t matter how many times I’ve seen her perform, I always marvel at her technique and artistry. She gave us her Coulda, Woulda, Shoulda show — and according to Phil afterwards, the longest concert of any performer on the BOTHS cruises so far. Patti gave us an amazing set of songs from parts she “Coulda, Woulda, Shoulda” played, with a mix of songs from parts she did play, including Meadowlark and Don’t Cry For Me Argentina. She also sang, I Get A Kick Out of You, seeking out her Anything Goes co-star Howard McGillin and serenading him in the audience. The concert only ended after a standing ovation and three encores. I was so invigorated, I barely slept that night.
 Tuesday night, Seth Rudetsky entertained us with his amusing and insightful, Deconstructing Broadway. Seth is an amazingly talented performer, writer and musical director among other things. I’m not sure there’s anything he can’t do. Best of all, he’s an energetic, funny guy that loves all things Broadway.
Among other things, he entertained us with his hilarious comparison of Patti and Madonna’s Eva Perons in Evita. Guess who won?

Seth Rudetsky
After two days off, with night excursions in Saint Petersburg, Seth was back Friday night, interviewing Broadway’s longest running Phantom, Howard McGillin, for his informal, Chatterbox. There were lots of great stories (including passing on Into the Woods) and Howard sang, A Man Could Go Quite Mad from his role in the original cast of The Mystery of Edwin Drood.
Saturday night’s entertainment was supposed to start out with Seth’s Chatterbox, interviewing Norm Lewis, only Norm had to leave the ship a couple days in to the cruise, fly to LA for a shoot on the TV series, Scandal, then fly back to rejoin the cruise– only he missed a connecting flight. So we had the bonus treat of two interviews with Patti. She’s certainly had a roller coaster-ride of a career and has many great stories to share.

Patti LuPone & Howard McGillin reprise their roles, singing, You’re the Top, with musical director Joseph Thalken. (Photo courtesy of Judy Perl Worldwide Travel.)
After dinner, we were treated to Howard McGillin’s big concert. I really love his voice and could listen to him for hours. One of the highlights of his show was bringing Patti onstage to recreate their number, You’re the Top from Anything Goes. I’d been fortunate enough to see them do it originally on Broadway (twice), so that made it extra special for me. This was the first time they’ve had the opportunity to perform together since. It was a really great concert.

Patti LuPone and Howard McGillin, after Howard’s concert. Patti’s husband Matt is on the right. (Photo courtesy of Judy Perl Worldwide Travel.)
Sunday, Norm made it back on the ship in the afternoon, shortly before we left Lithuania. With all the travel and jet lag, they scheduled him for a massage and I happened to be in the spa at the same time and got to chat with him. He’s a super nice guy. Late that night, Playbill had scheduled Broadway After Dark, which, after a misguided game of Broadway bingo (I shouted BINGO first Seth!), it luckily became a Chatterbox with Norm. It turns out he grew up about 20 miles from me and is only a couple months younger than I am. He ended the interview by singing, Rain from Once On This Island, which was absolutely incredible!

Seth’s Chatterbox with Patti LuPone.
Monday, Seth continued his interview with Patti and we were treated to two more songs. It wasn’t until then that I realized I’d never heard her sing, I Dreamed A Dream, live. She won the Oliver Award in 1985, for her performances in both Les Miserables and The Cradle Will Rock. Patti brings such depth to the song. She also wowed us with Buenos Aires from Evita.

Patti LuPone singing Buenos Aires.

With Norm Lewis.
After dinner, everyone was blown away by Norm Lewis in concert. What a voice and a great showman! It was the perfect way to end the Playbill portion of the cruise. We’d just seen Norm on Broadway recently in Porgy and Bess and he’s simply phenomenal.
Toward the end of his concert, our cruise director, Willie Aames, joined Norm on stage for a duet and the crowd went wild.

Norm Lewis in concert. (Photo courtesy of Judy Perl Worldwide Travel.)

Michael and Willie Aames.
After Norm’s concert, we celebrated the end of the cruise with one last toast. Michael and I got to chat with Willie briefly and thank him for making our stay of the Regent Seven Seas Voyager so memorable.
We actually still had one full day in Germany ahead but because our luggage had to be packed and outside our room that final night; the Playbill events ended a night earlier. This way, everyone got to dress up and there was no rush after the evenings festivities to get packed.
I forgot to mention that when we first got to our rooms, we had swag waiting for us. We received canvas Playbill bags that among other things, included a special edition print, especially for BOTHS3 that we were able to have signed by all the performers. I thought it was really a nice touch.
Playbill did an excellent job planning out this adventure. They kept us going non-stop for ten days, yet we were never rushed and still managed to have a little free time. Patti, Norm, Howard and Seth were frequently out and about, went on some of the tours and were often accessible.
I also really appreciated that we got daily updates of the Broadway events delivered to our room so we wouldn’t miss anything.

Michael getting our limited edition prints signed.
Unfortunately, Michael and I won’t be able to go on the BOTHS4 (Tahiti) but 5 and 6 are already in the works and we’re making plans.
Broadway On the High Seas is the perfect way to see the world and get a more intimate Broadway experience all rolled into one vacation.
WARNING: It’s habit-forming.
.
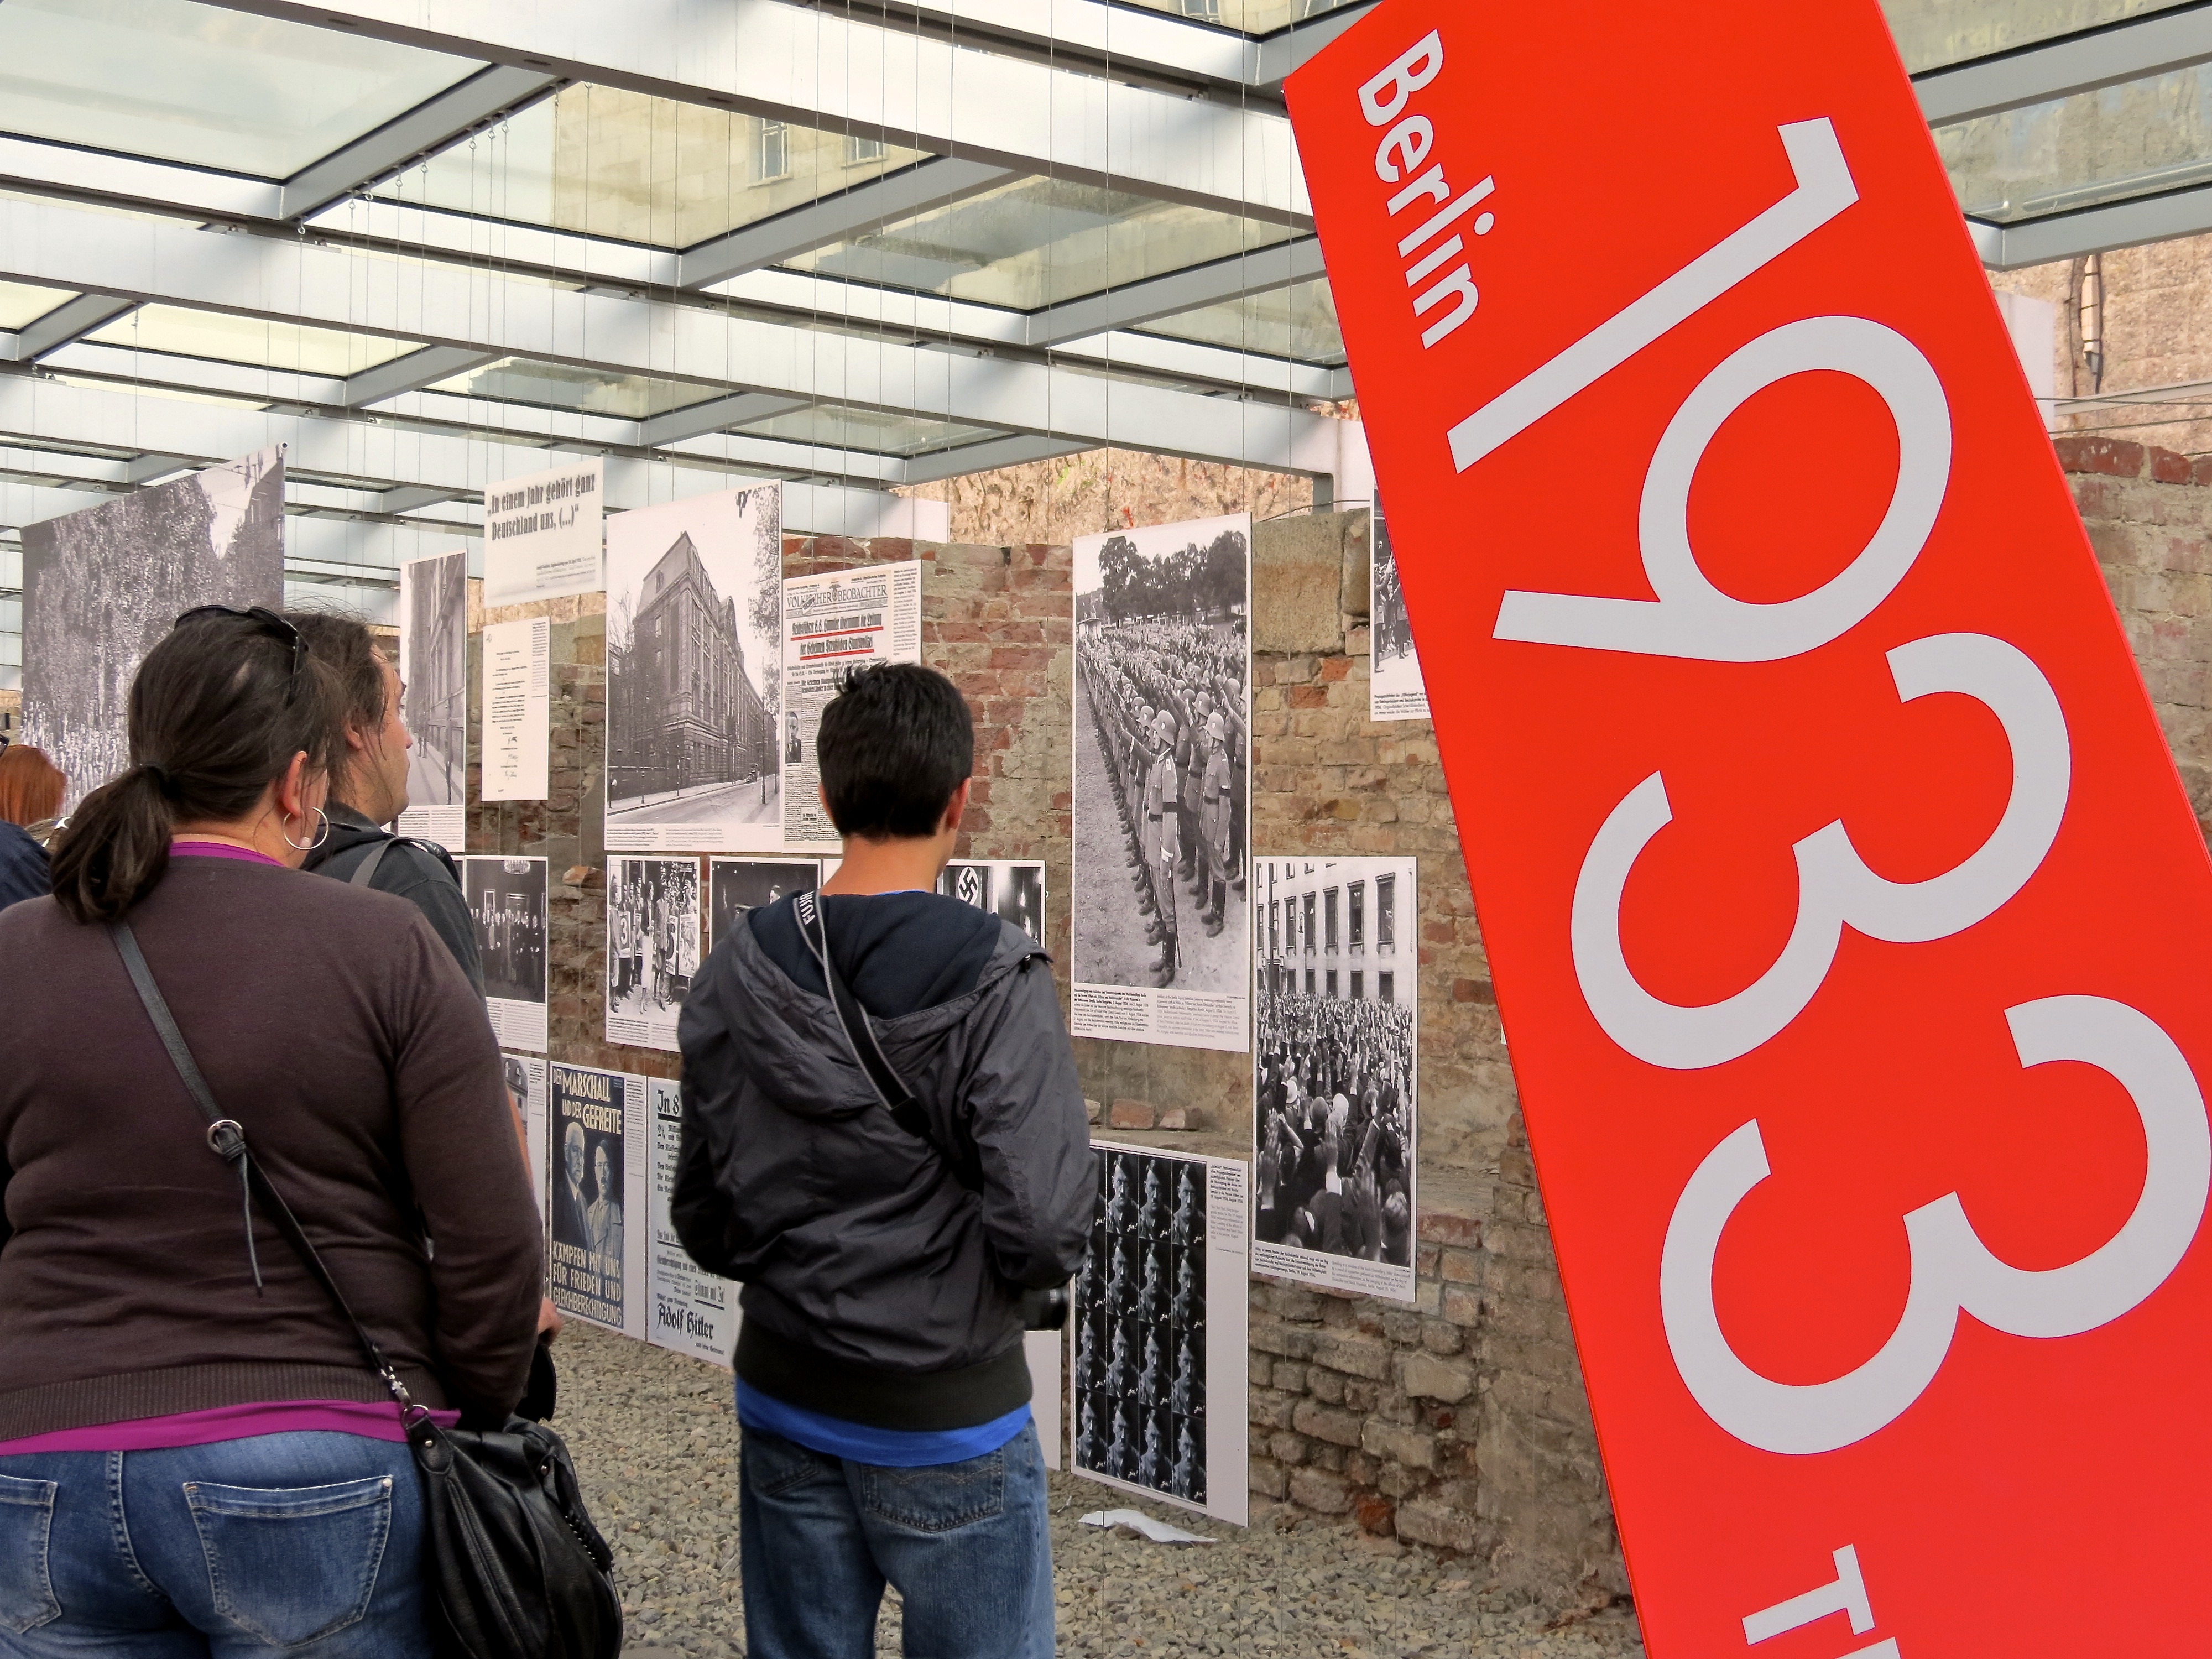
Baltic Cruise Day Ten: Berlin, Germany

The road to adventure.
Willkommen!
From the time I first thought about wanting to travel abroad, I wanted to go to Berlin. Of course my problem has always been that because of Christopher Isherwood’s The Berlin Stories, I wanted to visit 1920-30’s Berlin. Obviously, time travel isn’t possible– but Isherwood’s vivid portrait of the decadent cabaret and underground scene have always spoken to me.
I was more than content to have this opportunity to get a glimpse of this captivating city– with, or without the dark undertones that have marked its history. Even, if it meant six more hours of bus travel to do it.
 We started our day by getting on a bus at the port in Warnemunde, Germany for our three hour ride to Berlin. The trip was marked by the beautiful countryside and farmland, a brief bathroom stop and hundreds of wind turbines producing green energy. I think I managed to get in a short nap and I was all set for our tour, Echoes of the Past: Jewish Heritage.
Of the three different tours of Berlin, we thought this one would be the most interesting, considering it would also compliment our visit to Stutthof the previous day. I was also hoping to gain a clearer picture of the current German perspective of World War II.

A close up of the Reichstag Building.
When we reached Berlin, we stopped to meet our tour guide and he took us to the Reichstag Building first. The Reichstag is the home of the German Parliament. A monstrous building built in the late 1800s, it mysteriously caught fire in 1933 , the same year power was given over to the Nazi party there. Damaged, it was mostly used for military purposes during the war and was a central target of the Red Army during the Battle of Berlin in 1945 for symbolic reasons.

The historic Reichstag Building, home of German Parliament.
It sat for years in disrepair, was almost torn down and served a variety of uses before being fully renovated in the late 1990s when the parliament returned to its former home.

The top of the Brandenburg Gate.
Then we proceeded to the Brandenburg Gate. One of the most known landmarks in Germany, it was constructed in the 18th century and is considered an important symbol of Germany. It stands at the west center of Berlin.
While the Berlin Wall stood, the gate was isolated and inaccessible. So when the wall fell in 1989, there was much celebration and focus surrounding the site.

The Brandenburg Gate.

The old Berlin Museum.
The rest of our morning was spent at the Jewish Museum, Berlin. The museum is housed in two buildings and is only accessible by an underground passage from the old Berlin Museum. Designed by architect, Daniel Libeskind, the museum zig-zags though spaces, including vast voids, housing permanent and special exhibitions of German-Jewish history. There are three particularly large spaces, representing the Holocaust, that are meant to be experienced.

The Jewish Museum, Berlin, designed by architect Daniel Libeskind.

The Garden of Exile.
The first space we visited was the Garden of Exile which attempts “to completely disorient the visitor. It represents a shipwreck of history.” (Daniel Libeskind, 1999) When you first look at it up close, and as you start to walk through it, it appears to be very straight and vertical– but you soon find yourself stumbling, almost dizzy and disoriented through the maze. From the outside of the museum, as we were leaving, we could see the extreme angle and tilt of the garden in comparison to the level ground that created this feeling.

Walking through the Garden of Exile in the Jewish Museum, Berlin.

Inside the Holocaust Tower. Notice the ‘ladder to nowhere’.
Then we went in the dark, chilling Holocaust Tower. It is a 79 foot high, bare concrete tower with only a small shaft of light entering through the roof.
There is a metal ladder on one wall, far above your head. Unreachable. It appears to go to the top– a possible escape… but it doesn’t quite reach the blackness of the ceiling.
The feeling of the space is cold, dark isolation, with no way out.

Looking up inside the Holocaust Tower.

10,000 faces in the Shalekhet- Fallen Leaves exhibit.
The third space was the only area of the Libeskind ‘void’ that could be entered. Shalekhet- Fallen Leaves designed by artist, Menashe Kadishman, consists of 10,000 faces punched out of steel. They are scatter on the floor of the “Memory Void” and visitors are encouraged to walk on them.
The artist intended them to not only represent the victims of the Holocaust (Shoah) but dedicated them to all victims of war and violence.

Inside Libeskind’s, “Memory Void”. The exhibit, Shalekhet- Fallen Leaves.

On exhibition, the Star of David, all Jews were forced to wear as identification by the Nazis.
Through the main museum, you had to go to the top to enter the exhibition rooms. Then like a maze, you walked through Jewish history, with only one way out as you made your way to the bottom of the museum.
Michael and I explored most of the museum on our own, leaving the group behind so we could go at our own pace.
We had lunch in the courtyard of the museum and a short break to wander down the street before the tour continued.

This rather ornate building next to the museum is now an apartment building.
Next, we visited the Holocaust Memorial named, The Memorial to the Murdered Jews of Europe. It was designed by Peter Eisenman who described its design as to produce feeling of uneasy confusion and represents an “ordered system that has lost touch with human reason”. It consists of 2,711 concrete slabs of varying heights, on a grid pattern of unlevel ground.

The Memorial to the Murdered Jews of Europe in the center of Berlin.
The English pamphlet, though, states that there is no intended symbolism.

Inside the grid of the Holocaust Memorial.
Our tour guide said that he believed the intention behind the design was to allow visitors to envision their own meaning based on what experiences, or desired meanings they intended to gather from visiting the memorial. Below the memorial, underground, is a vault with all the known names of the Jewish Holocaust victims.
The first thing I saw when we approached, was a large cemetery. The outer stelae (slabs) are lower to the ground and as you walk through the memorial, you become engulfed, with the stelae towering over you in height. I couldn’t help but notice its similarity to the Garden of Exile at the Jewish Museum.
A big controversy arose over the memorial because it only recognized the Jewish victims, leading to memorials for other war victims being erected throughout Berlin.
On the bus, we went past Checkpoint Charlie but didn’t stop– which upset me because it was listed in the tour description. Our tour guide said he doesn’t stop there because it is “100% made in China.” The ‘checkpoint’ is not the original, it is a fabrication, standing on the original site. He considers it nothing more than an overcrowded tourist-trap. (It is surrounded by dozens of souvenir stands.)
Topographie des Terrors.
Our next to last stop in Berlin, held two important exhibits. One of the few standing sections of the Berlin Wall and below and beside it, an indoor/outdoor exhibit, Topography of Terror.
Topographie des Terrors stands on the site where three buildings used as headquarters by the SS and Gestapo once stood. The buildings were largely destroyed in 1945 by allied bombing and the rest demolished after the war. Only part of the foundations remain. Against those foundations, stands the outdoor exhibit which focuses on the events of the year 1933 when the Nazi regime came into full power.

Topographie des Terrors and behind it, the remaining walls of SS and Gestapo headquarters.
It’s a great exhibit and I’m really glad I got to see it. I found it really powerful and moving, especially having been to the concentration camp the day before. It was like taking a step backwards and seeing where (and how) it all began.

The Berlin Wall.
The Berlin Wall. As an average person, of my age, witnessing the changing world history– The the fall of communism, the tearing down of the wall, the reunification of East and West Berlin– it was an important moment in my life. The images from the original media coverage are engrained in my mind.
I remember talking to a friend, shortly there after, who was in Germany with a touring show at the time, who was lucky enough to be there as it happened. I remember how jealous I was that they were present at that important moment in history.

“WHY” at the Berlin Wall.
The wall itself, is not that threatening. It’s a very thin concrete wall. It is the symbolism of what it represented and how it affected so many lives that’s important.
Our tour guide recounted his experience when the wall came down: Friends were calling him in the middle of the night but he didn’t believe them. Finally he heard the reactions of people in the street and realized it must be true. An aunt of his that lived on the other side (I don’t remember who he said lived in East and West Berlin), showed up at his door the next morning, suitcases in hand. She brought with her, all her important belongings because she was afraid the freedom to cross the line wouldn’t last and she would be separated from them again. They had been separated for years.

Looking down the length of the remaining piece of the Berlin Wall.
So I was finally here. I was staring at this insignificantly simple structure that represented so much heartache and political control of people for so long. I was finally able to link my own personal recollections– my history– in this very spot, which was a very important moment in time for me.

My moment at the Berlin Wall.
I could go on a tangent here about the evils of war, political control and the horrific events that have ruined so many lives of average people (Look at what’s happening in Egypt and Syria today.) But I won’t.
I was content. No, exhilarated to be here and see this first hand.
It started to pour just as it was time to get back on the bus. We had to run through the rain to keep from getting totally drenched. I suddenly realized, though we’d seen a lot, I was a little disappointed with our visit to Berlin.
We still had one more stop before heading back to the ship– and then I looked out the window and we were suddenly driving through the shopping district. There’s no other way to put it, it was simply amazing! Blocks and blocks of tree lined streets shading nearly every designer shop you could possible think of– it was a shopping mecca. Beautiful!
It made me want to go back before we’d even left.

Ornate gates at the Schloss Chalottenburg.
Our last stop in Berlin was the Schloss Charlottenburg (Palace). We didn’t have much time here except to walk around the front courtyard and statue of Friedrich Wilhelm I. It was built at the end of the 17th century and later expanded. I wish we’d had time to tour the inside and the incredible gardens on the other side of this massive palace.

The stunning Schloss Charlottenburg in Berlin.
I guess I’ll have to put that on my list for things to see the next time I’m in Berlin.
I’ll be back.
Baltic Cruise Day Nine (Part Two): Gdansk (Danzig), Poland

A ship sailing near the Polish port of Gdynia.
In all the excitement and anticipation of going to Stutthof in the morning, I’d totally forgotten we were going to Gdansk for a quick tour in the afternoon.
Our actual port city on this stop was Gdynia. We didn’t really see much of it though, except passing through on the bus. What I did see of it, appeared to be a fairly modernized city, even though its history dates back to the 1770s.
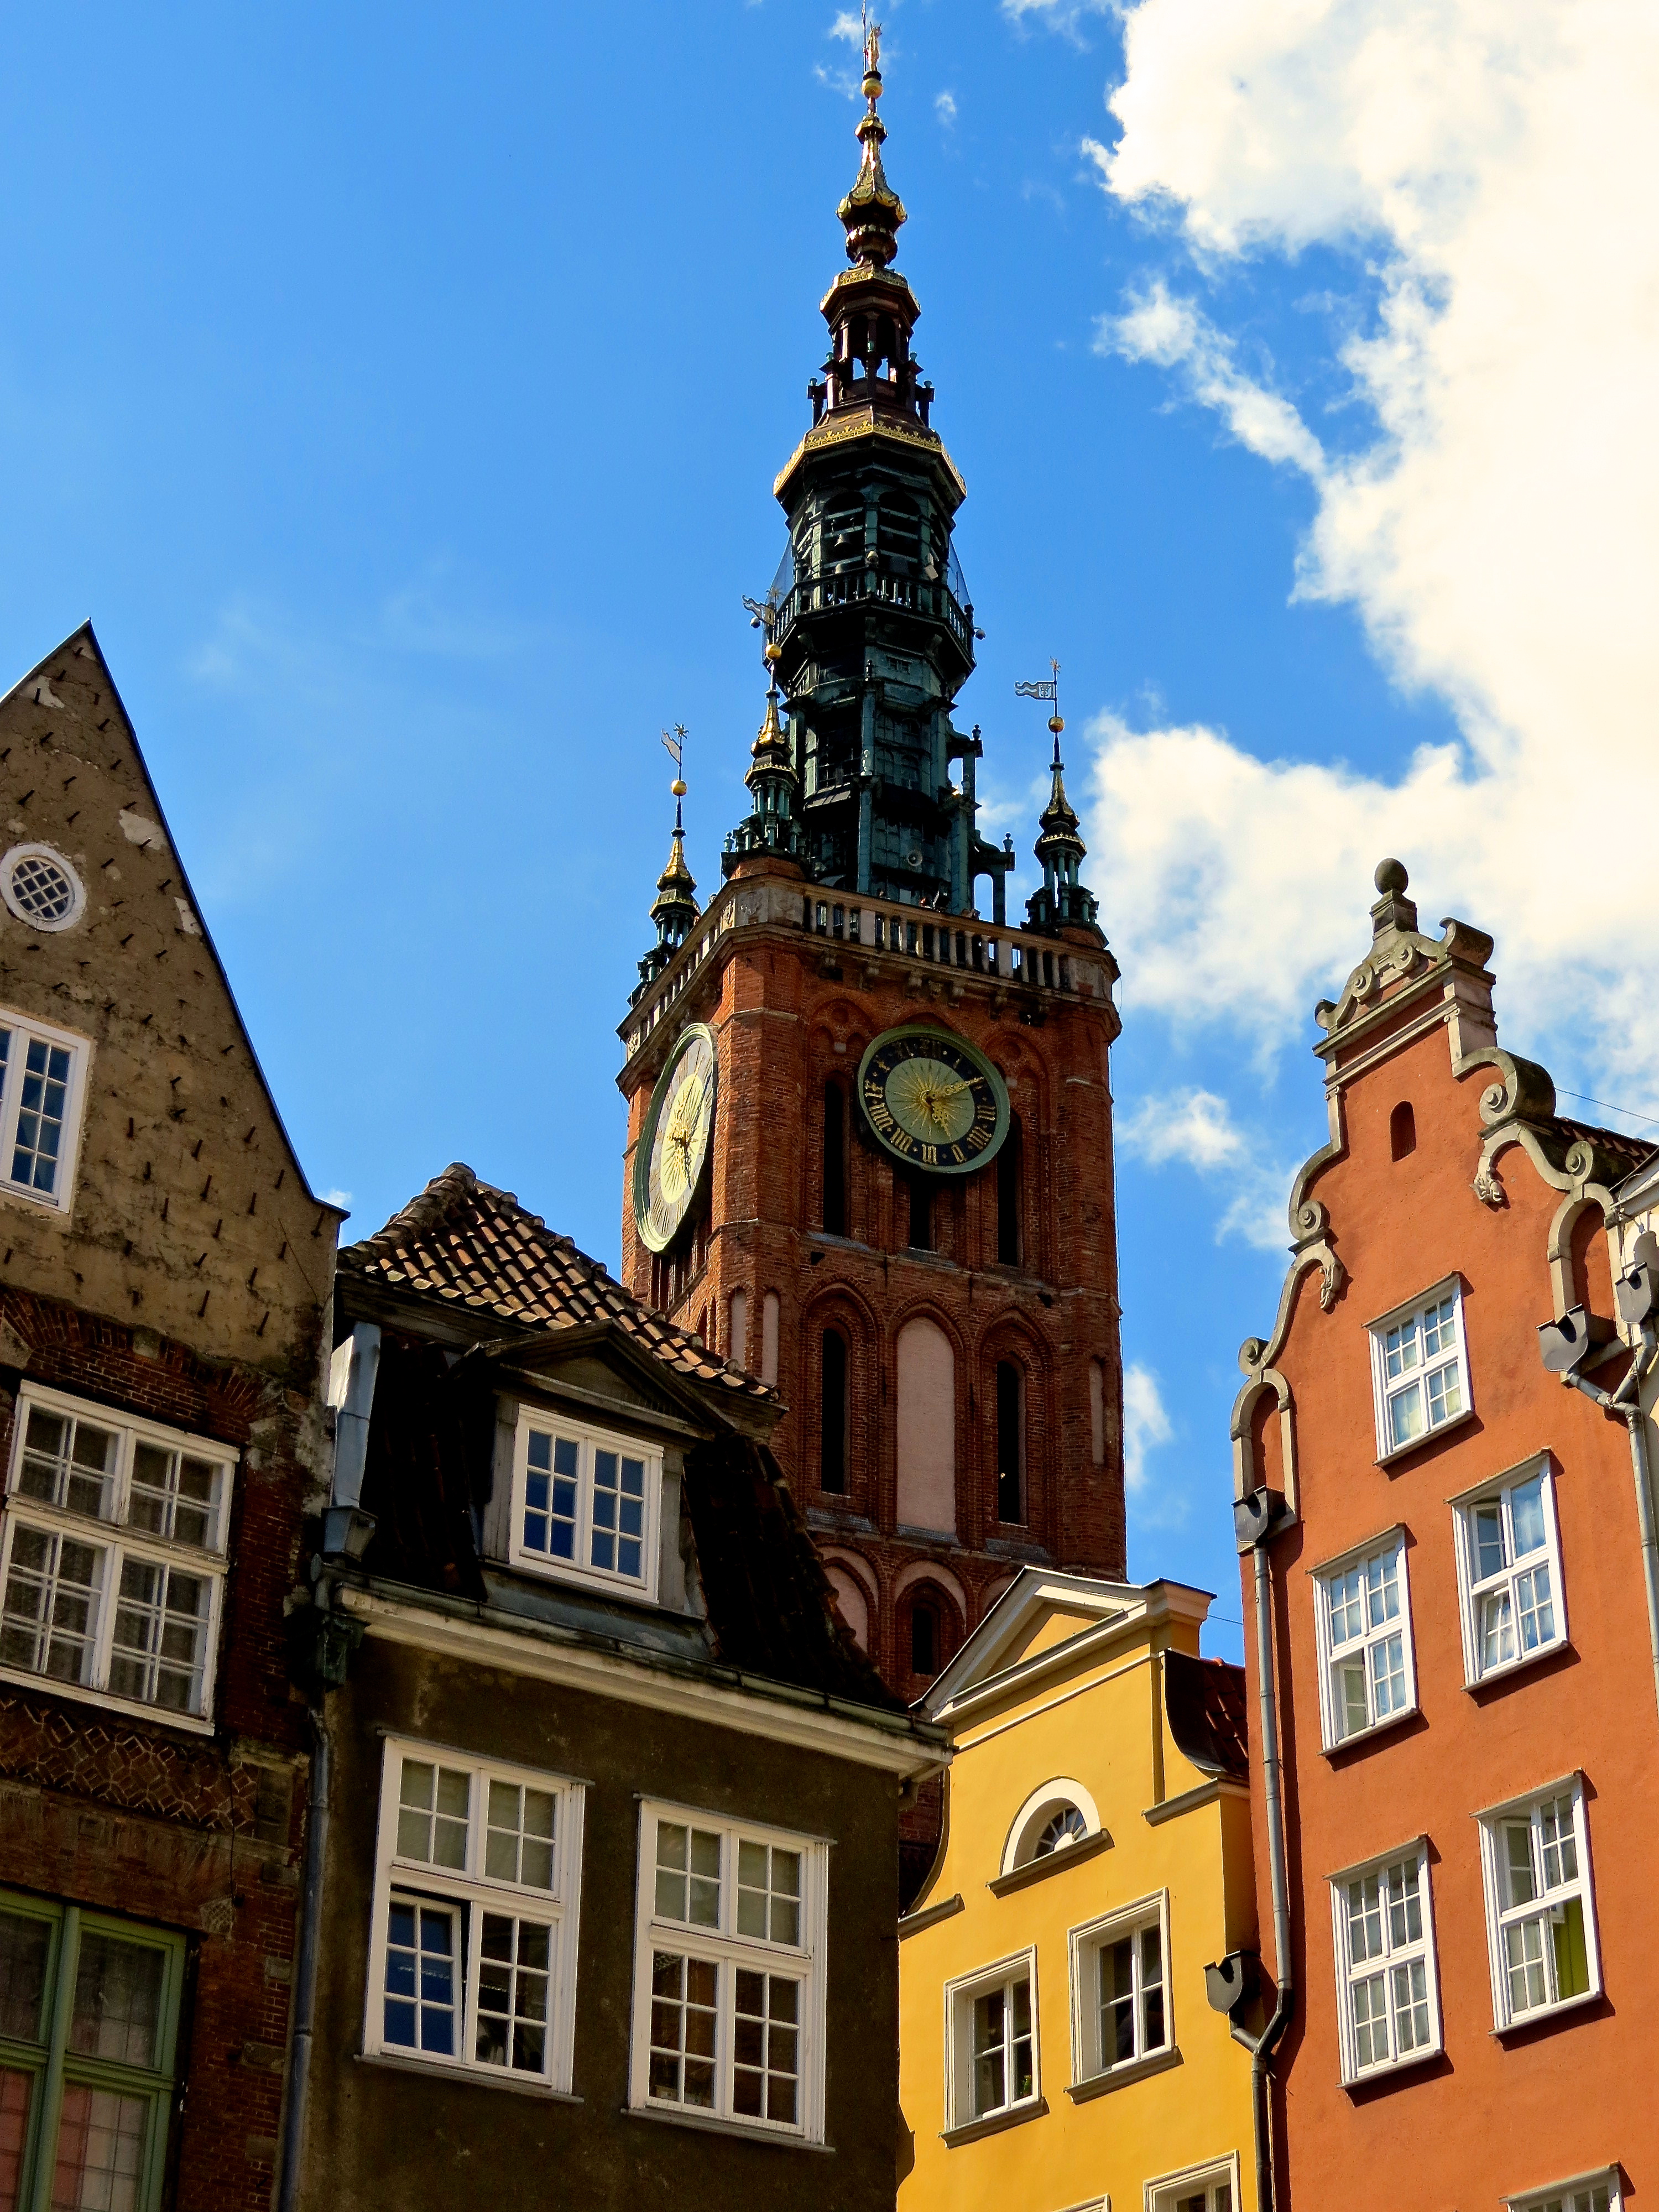
Gdansk, also known as Danzig, is a beautiful European city. Full of historical charm, I found it to be much of what I expected from an older. European city– and more.

The Royal Route in Gdansk.

I love the color and lines of the buildings in Gdansk.
The city dates back to the 10th century, having been both a part of Poland and part of Germany over its complex history. It is also known as the birthplace of the Solidarity movement, which led the fight to end Communism in Central Europe. Gdansk, combined with the cities of Gdynia and Sopot have become a metropolitan area known as Tricity.
We had an advantage here. Since this was a private tour, our guide got us oriented as to where we were and pointed out interesting landmarks and then let us go out on our own to explore.

Neptune Statue
On Long (Market) Street, we saw the rather famous Neptune Statue, created in 1617 by architect Abraham van den Blocke. Then we visited St. Mary’s Church, which is the largest brick church in the world.

The clock of St. Mary’s Church.
This time of year, the streets of Gdansk become a festive open air market with hundreds, if not thousands of vendors selling everything from clothing and art to wine and sausages.

The seasonal open air market in the streets of Gdansk.
I could have spent a whole day just wandering through the streets, sampling all the magnificent food offerings and shopping the unlimited variety of merchandise for sale. Many of the streets were crowded but there was no rush. It was a very relaxing atmosphere.

Gdansk City Hall

Stunning historic architecture around every corner.
We walked to City Hall, saw the Town Hall Tower as well as many other points of interest before returning to the bridge at the Motlawa river where we rejoined our small group.
Such a beautiful, clean city. I could easily spend several days here relaxing and exploring.
The Town Hall Tower rising about the city of Gdansk.

The Motlawa River. In the distance (right) you can see the medieval Gdansk Crane.
I’d like to extend a very special thanks to Judy Perl of Judy Perl Worldwide Travel (NYC) for making this incredible day possible.
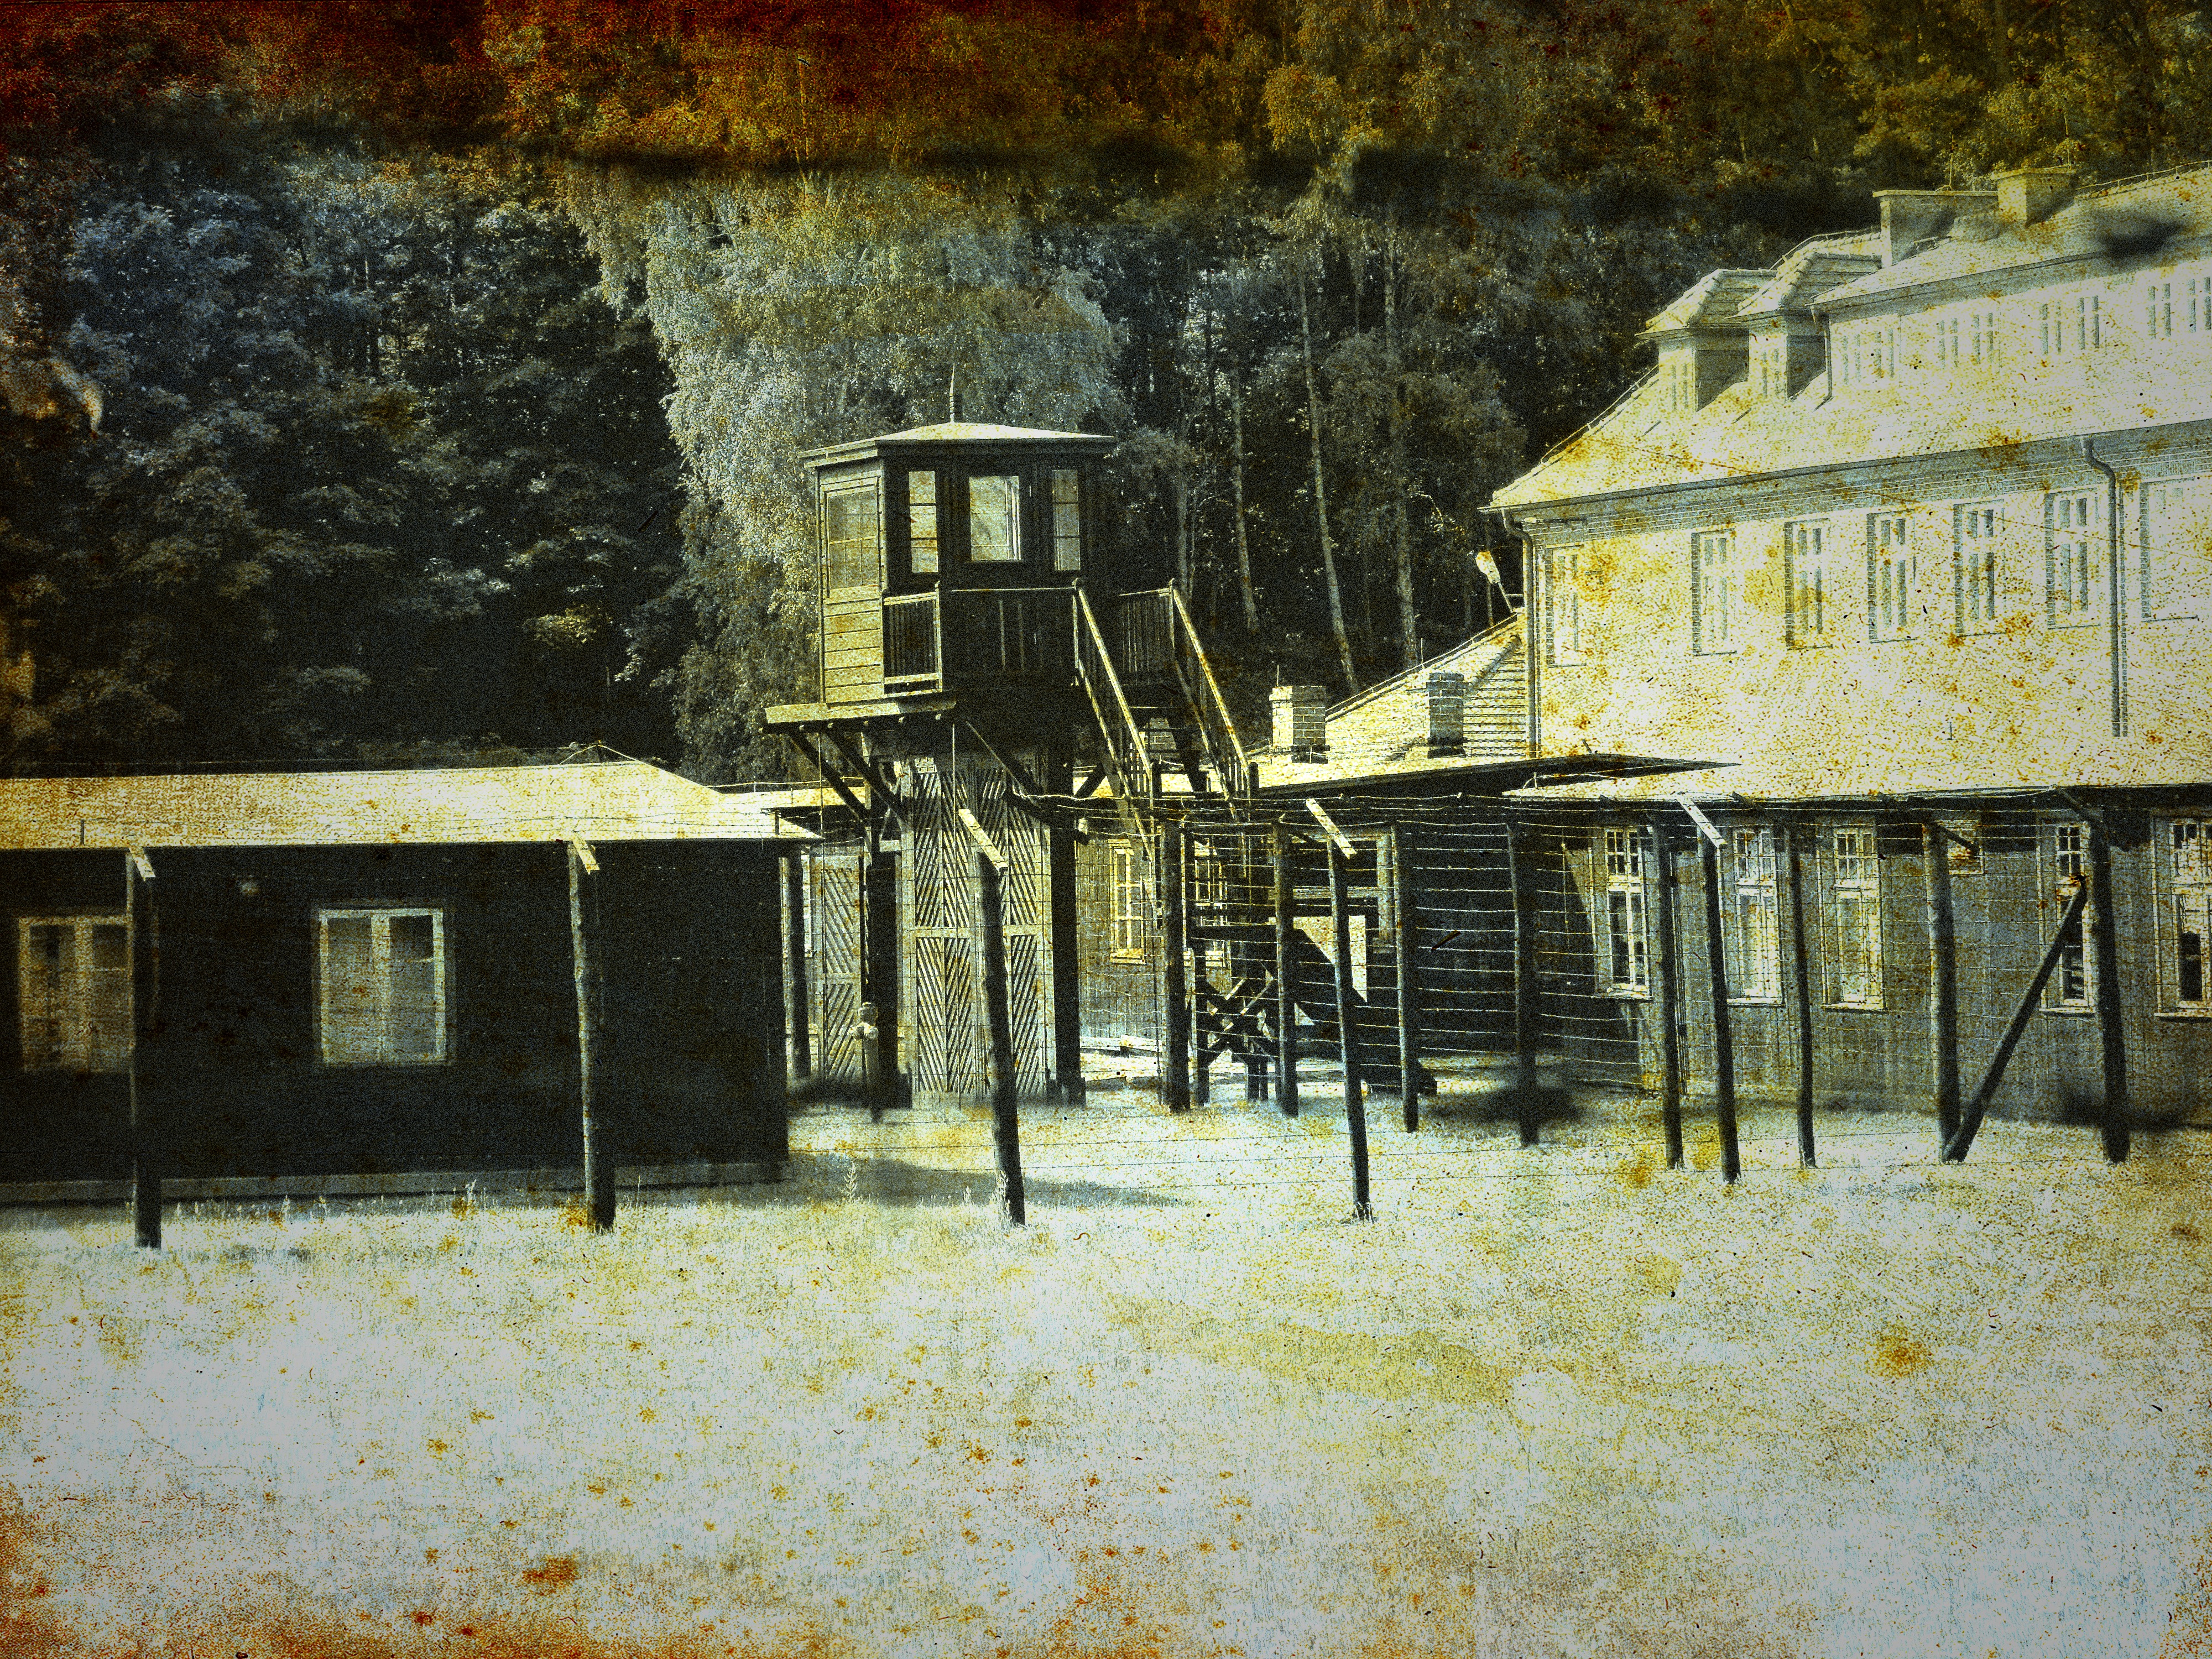
Baltic Cruise Day Nine (Part One): Stutthof Concentration Camp
Stutthof Concentration Camp.
It’s hard to know where to even start this post. I have so much I want to say– that to include it all in one post would be impossible. I’m going to try to keep this post focused on our visit to Stutthof, itself; and I’ll follow up later with a more personal post about my feelings on the subject of the Holocaust and my commitment to the importance of retelling the horrific story that can not and should not be forgotten.
I must say here that my involvement in education about the Holocaust began nearly twenty years ago with a play adaptation I wrote, that in subsequent years, has been performed for more than 25,000 students.
I had to visit here.
I had to witness it with my own eyes.

Entrance to the Stutthof Museum.
Michael was able to arrange a private tour to the Stutthof Museum through our travel agent way in advance of our trip. On past Regent cruises, it had been offered as an excursion but it was not on the itinerary for our cruise. Our travel agent, Judy Perl, whose family was also on the cruise, thought the prospect of going would be a good experience and asked if we minded if her family joined us. We readily accepted. So that morning, our party of seven, boarded a mini bus for Stutthof.
(A side note: The tour to Stutthof was later offered to our fellow cruisers as a late add-on and they ended up with five full buses!)

Outside the Stutthof Concentration Camp.
In 1939, the Stutthof Concentration Camp was built in the former Free City of Danzig territory, 34 km (21 miles) from Danzig (now, Gdansk). It is now known as the Stutthof Museum or Muzeum Stutthof w Sztutowie.
Stutthof was the first camp built outside of German borders and was the last camp to be liberated in May 1945.
It was originally intended to house Polish undesirables as an internment camp but in 1941 became a labor camp. In early 1942 it became a concentration camp. It is believed that approximately 110,000 Poles and Jews from all over Europe were sent here. The crematory and gas chamber were built in 1943, used primarily to execute patriotic Poles. In June 1944, they were used for Jewish executions as part of Hitler’s Final Solution.

The building where new arrivals were processed.
The original, old camp had only eight barracks but was then expanded with many more barracks as part of the new camp. Surviving documents show people from at least 28 countries were imprisoned here. Outside of the Stutthof facility, there were 39 sub-camps scattered throughout Poland.
Men, women and children lost their lives here. It is estimated that more than 85,000 people were either shot, hung, gassed or died of malnutrition and disease here. In 1945, of the 50,000 remaining prisoners in the Stutthof camp system, half of them died. 5,000 died on a death march to the Baltic Sea, where they were forced into the water and machine-gunned.

Known as the Death Gate, this is the prisoners entrance to the camp.
When we arrived at Stutthof, we stood for a long time inside the main gate near the SS headquarters just outside the camp itself which was completely surrounded by barbed wire. Quite frankly, I tuned out most of what our tour guide was saying, lost in my own thoughts. Most of the information she was relaying to us, I had heard before– this was a deeply, personal experience for me.
The camp and the museum exhibits are quite sterile. By that, I mean there is nothing displayed in an effort to encourage emotion. Still, I couldn’t help but shudder when I walked through the Death Gate, past the barbed wire and into the camp.
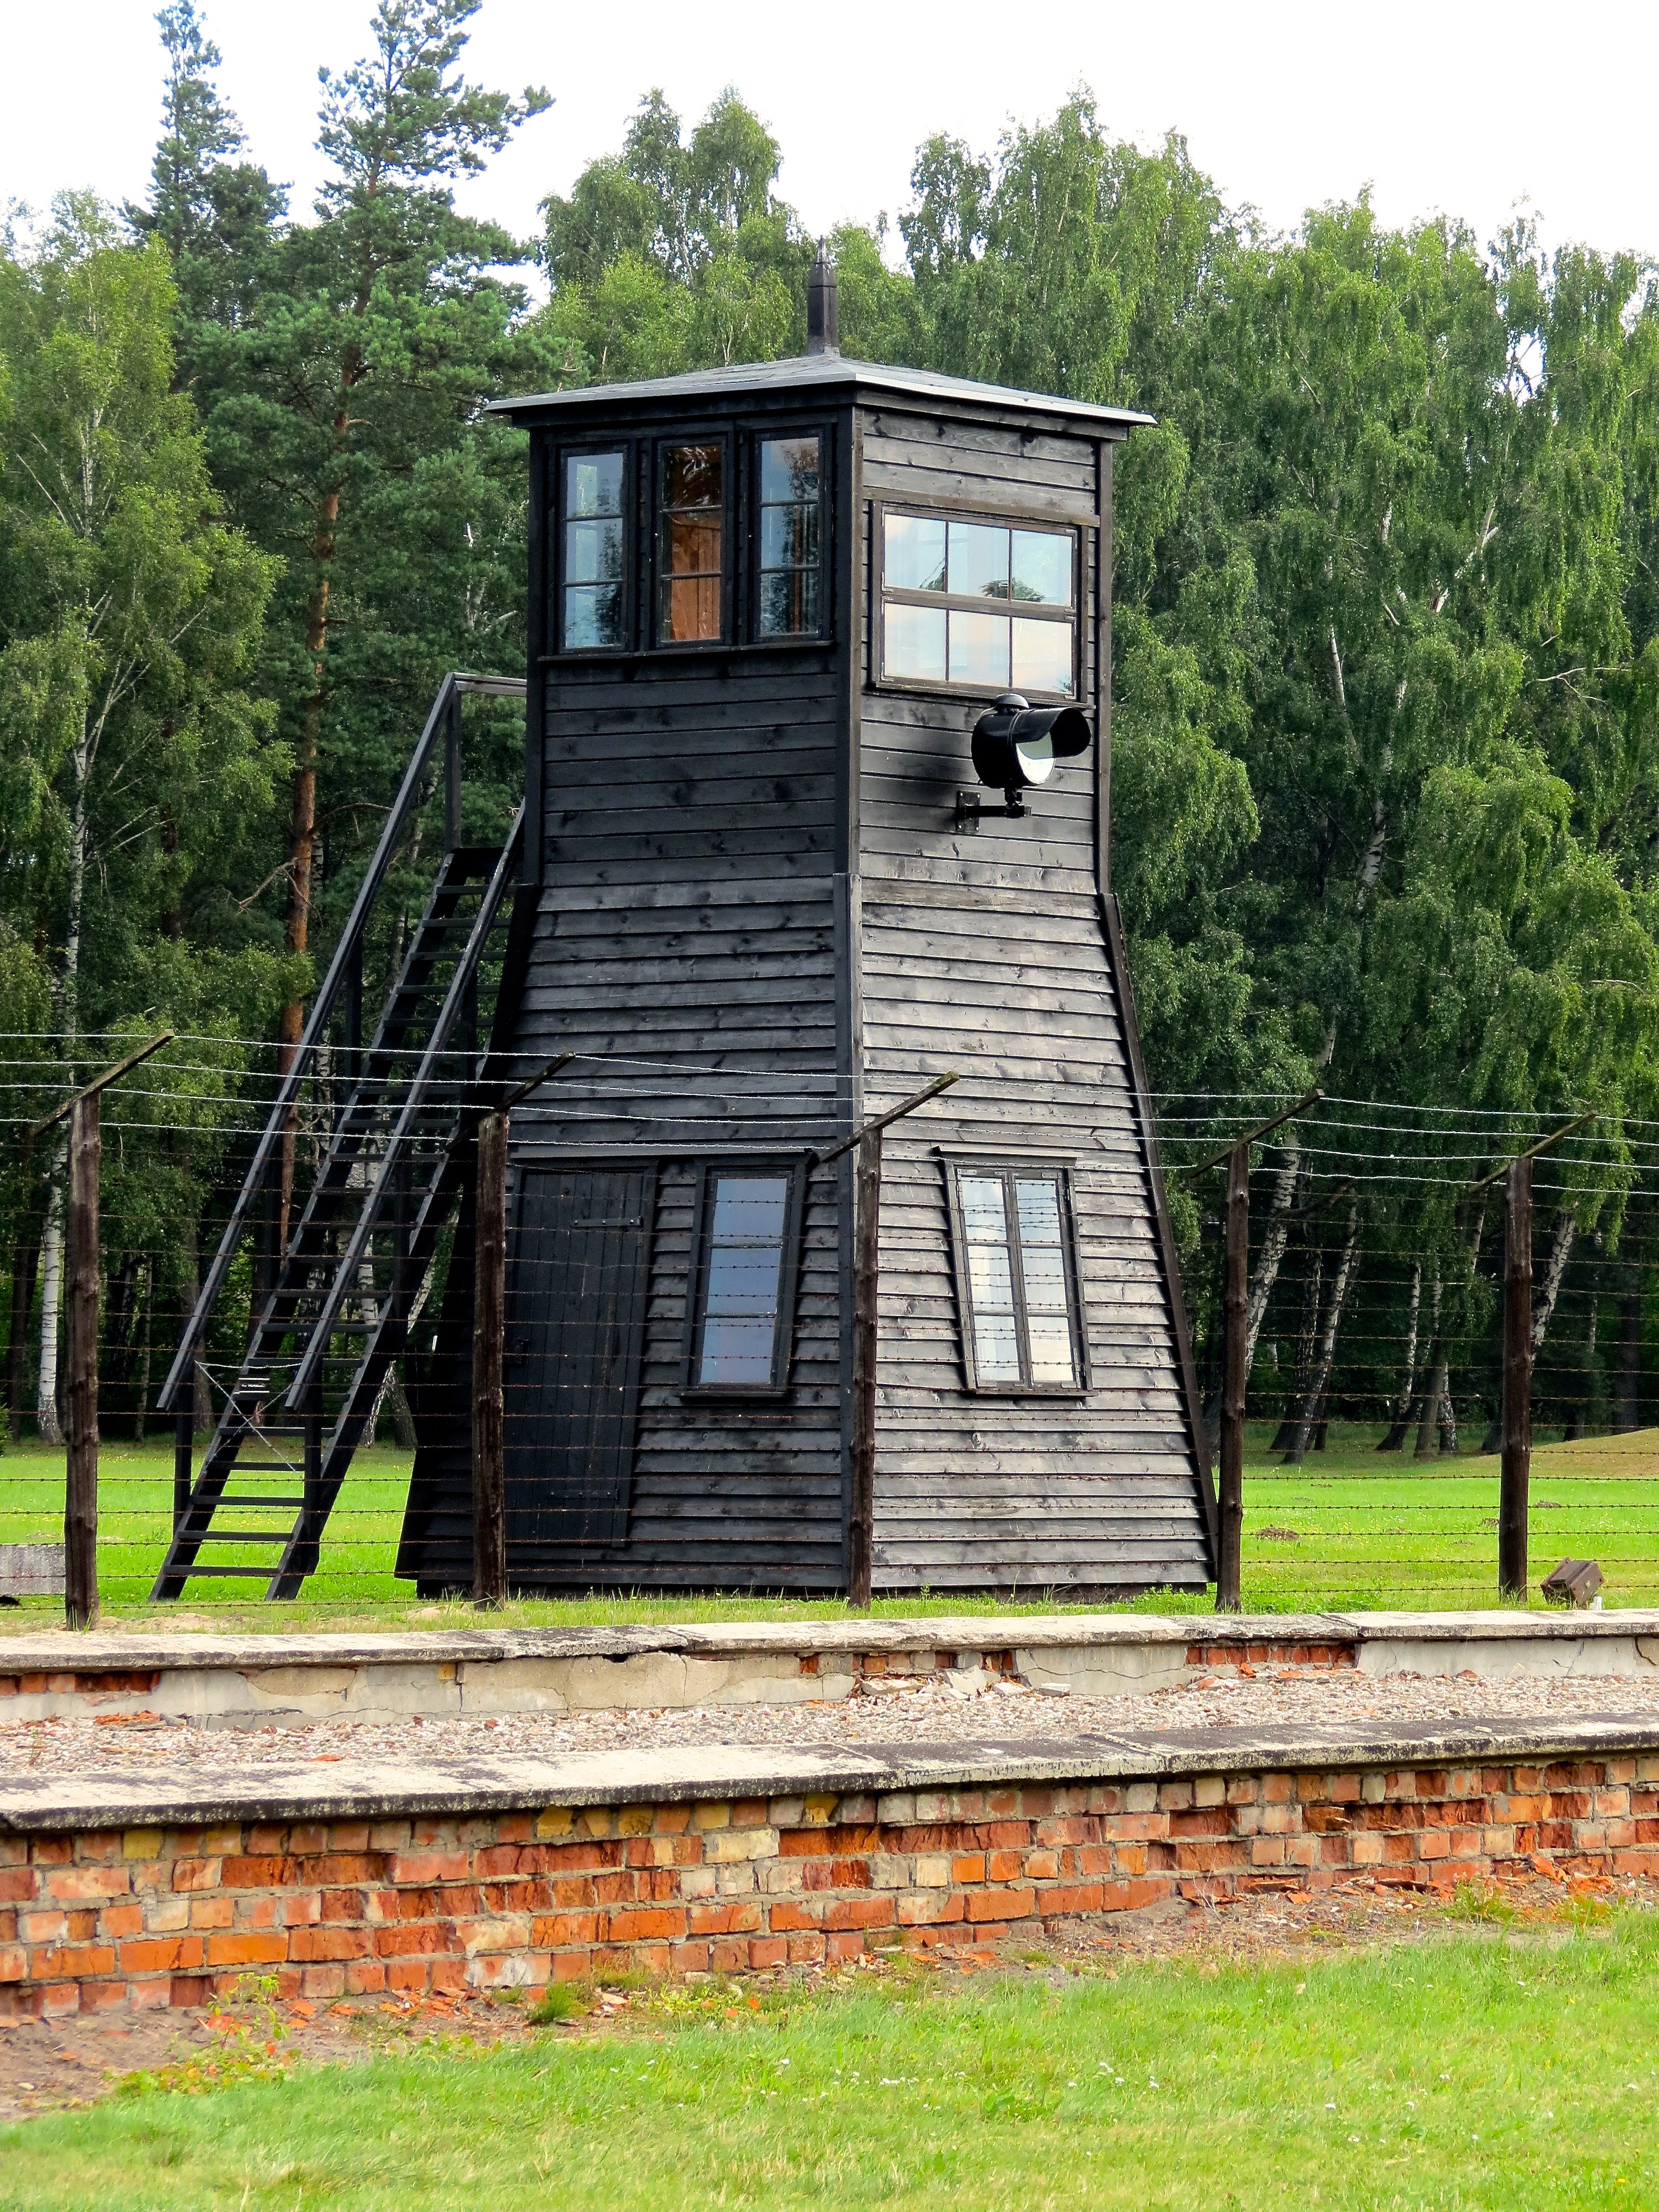
One of the guard towers standing watch over the camp.
My head was full of the atrocities that took place here. The horrifying conditions, the torture… they even experimented with making human soap from the victims’ remains.
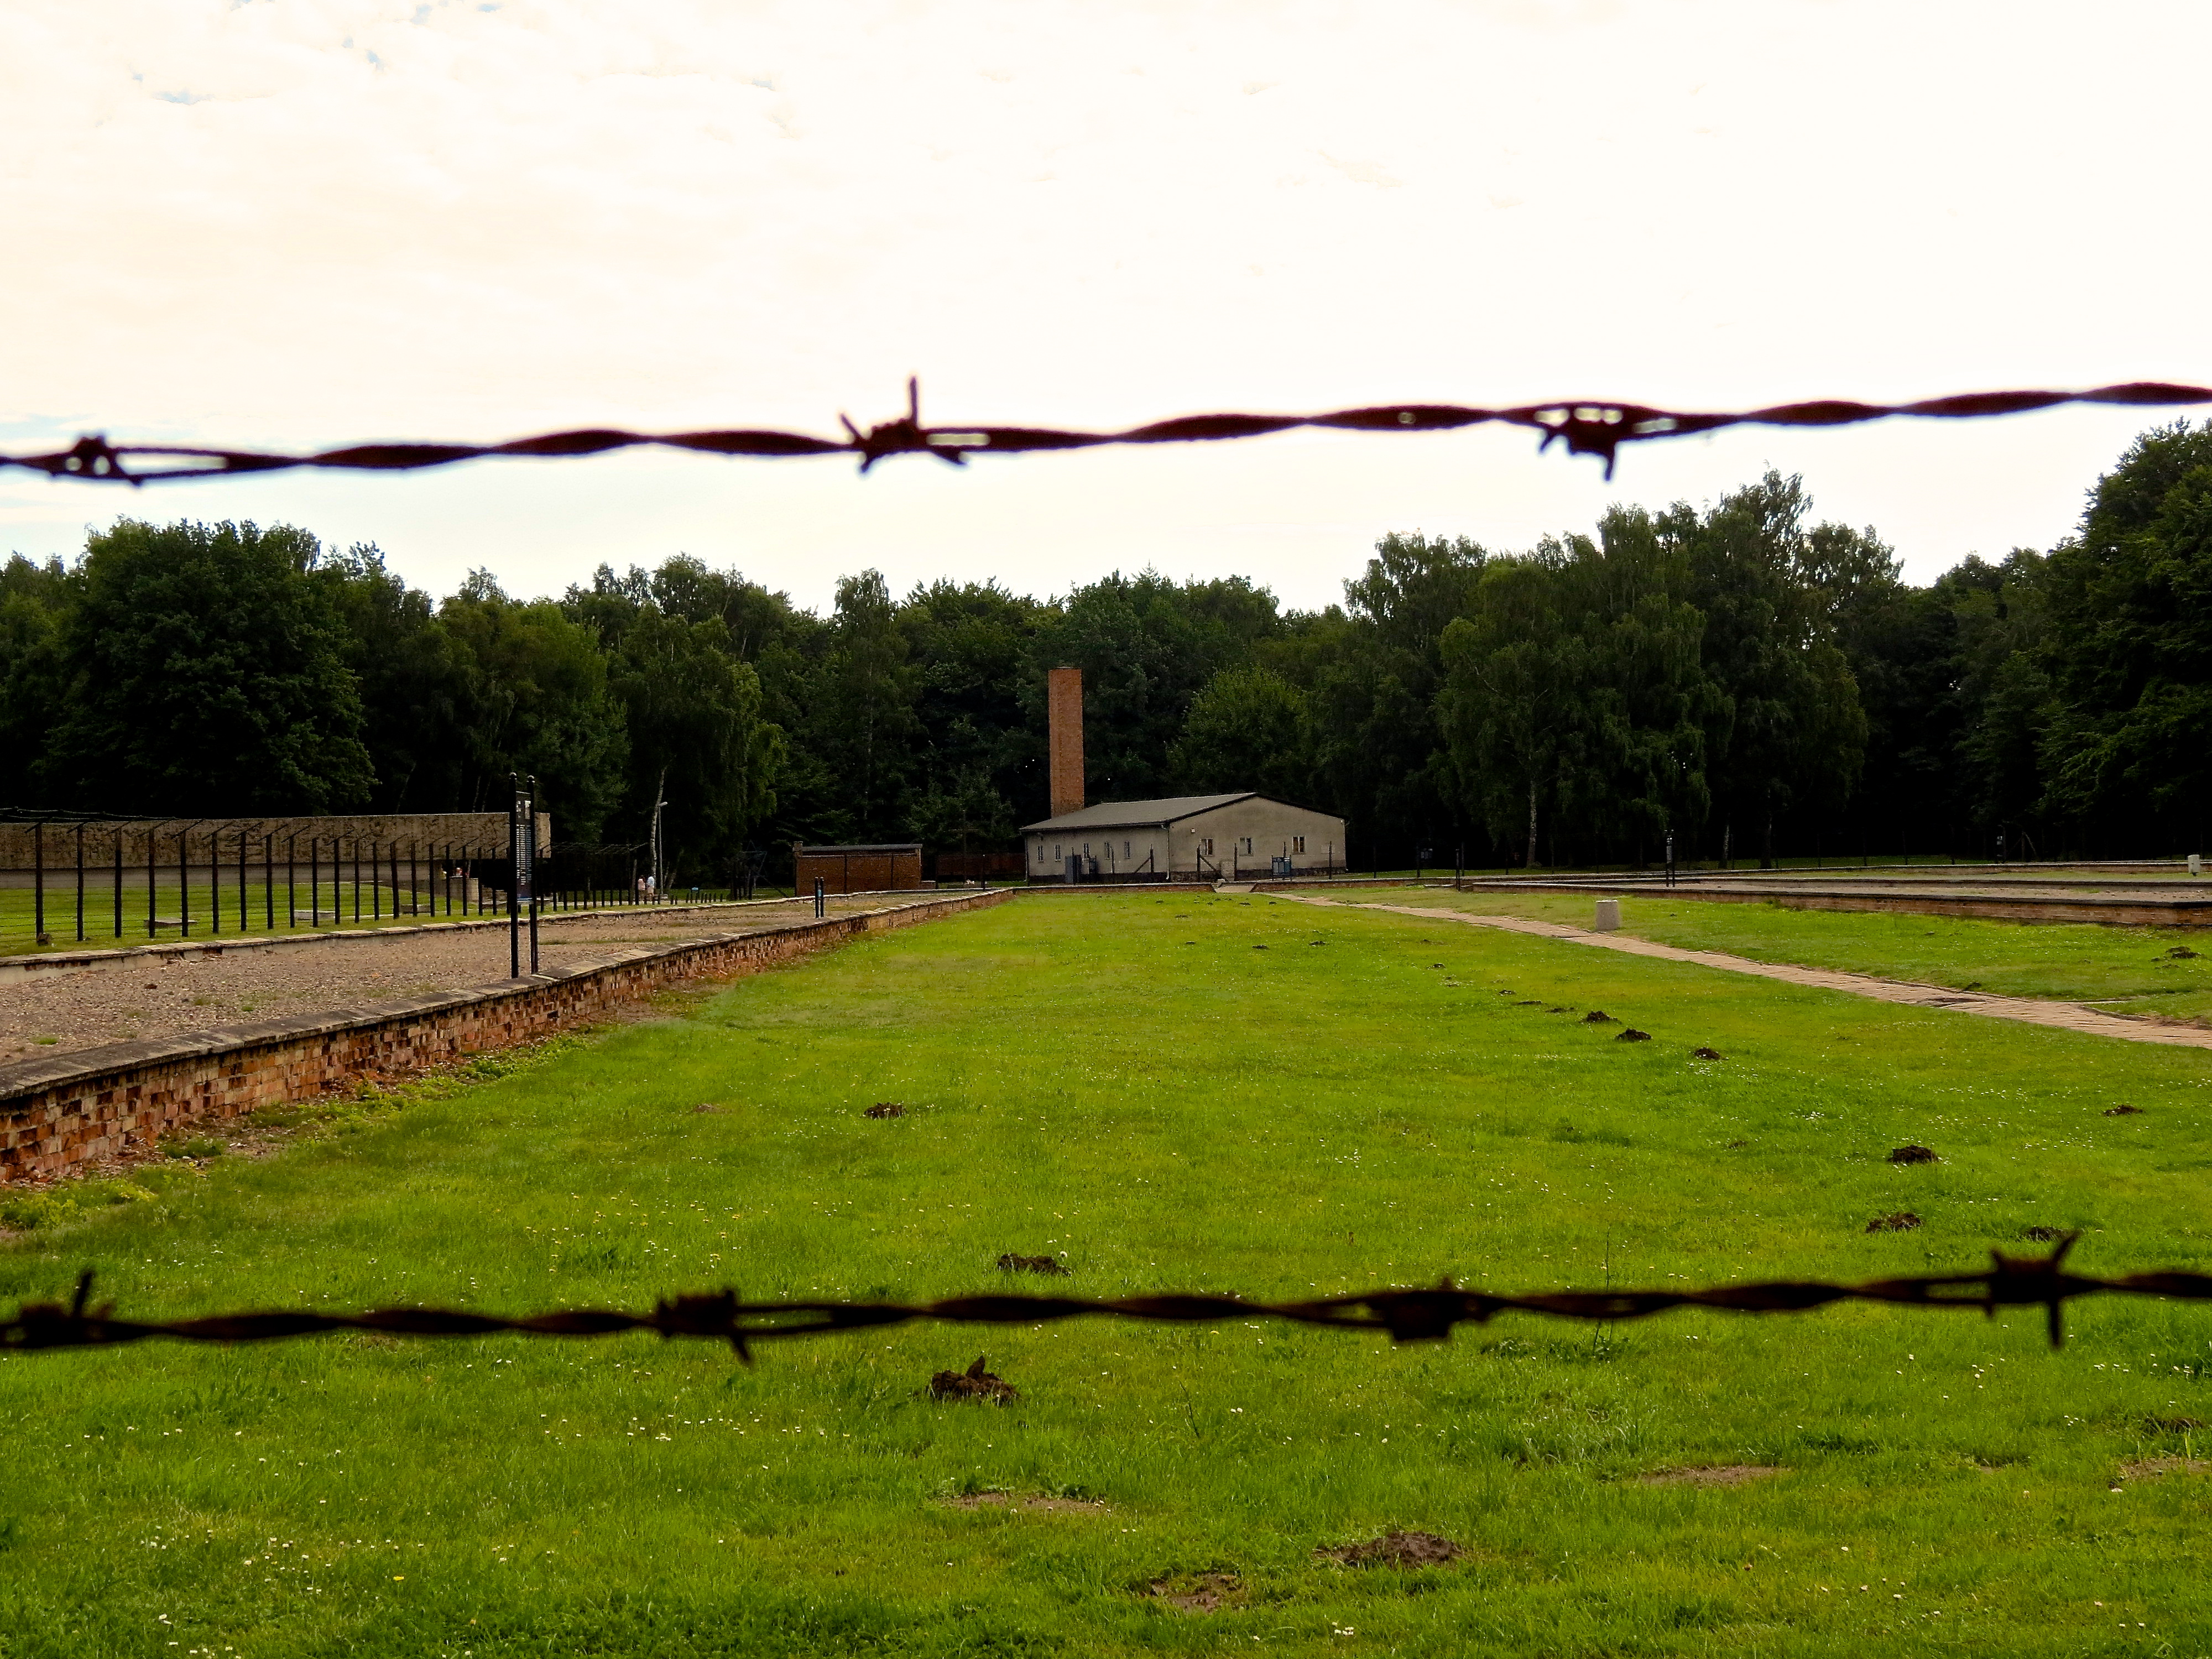
Some of the barracks still stand. Guard Towers surround the camp, assuring that no prisoners could have escaped. In the center of the large fenced yard are the crumbling foundations of the workhouses. Of course, much of the camp was destroyed as the Allied troops approached, in an effort to eliminate any evidence of what occurred here.
At the far end of the camp stands the gas chamber and crematory. I couldn’t believe how incredibly small the gas chamber was… the interior, possible 12 feet by 20 feet at the most.
In the distance stands the gas chamber and crematory.
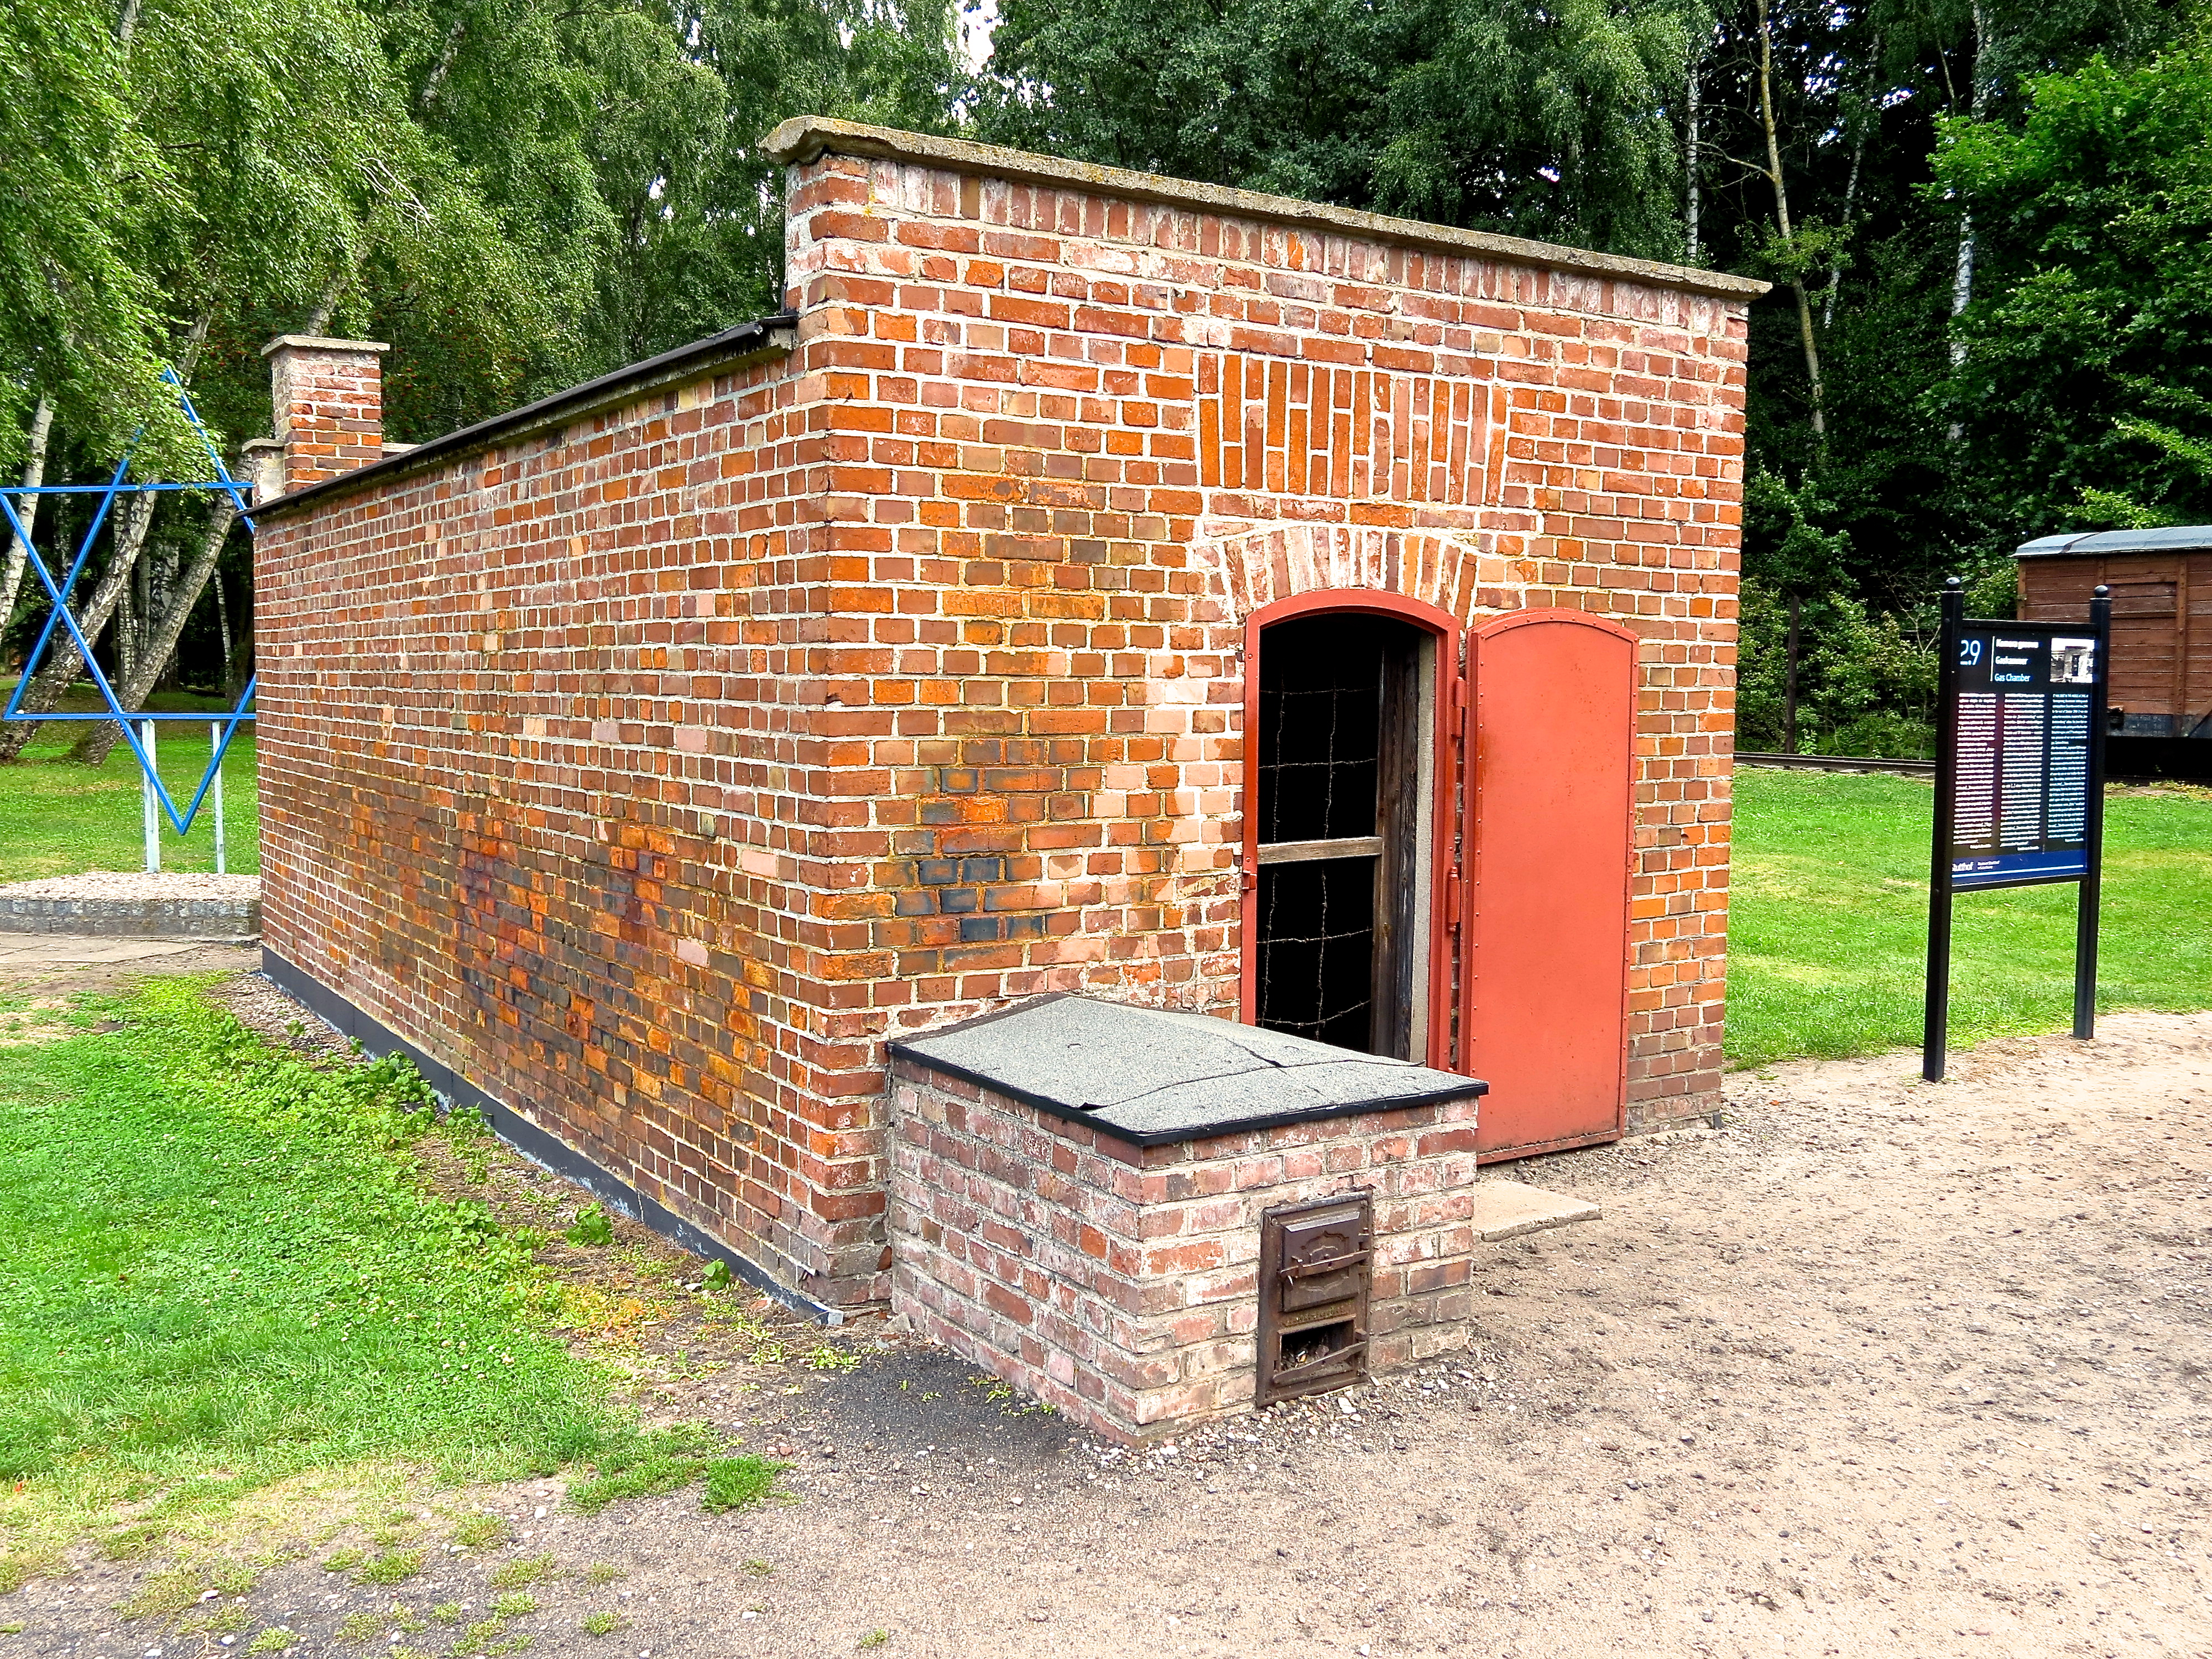
The gas chamber at Stutthof.
In the corner, a marker and replicated gallows stand where hangings took place. It stands very near an old wooden gate crossing train tracks that brought in cattle cars full of prisoners.

The location of the new camp at Stutthof.

Barrack markers for the new camp.
Outside the old camp, the location of the new camp barracks is memorialized with large white stone markers.
The majority of the camp is a wide open field, scattered with what remains from this defining moment in history.
I’ll let the rest of the pictures speak for themselves.
I will never forget this day.

A prisoner’s uniform on display.

Rows of bunks crammed into the barracks. Many prisoners were forced to sleep on top of each other on the floor.

A toilet inside one of the barracks.

Scratchings by prisoners on one of the posts inside the barracks.

The crumbling foundation of one of the workhouses.

Cattle cars were used to transport prisoners into the camp.

Looking inside the gas chamber.

Looking up at a guard tower.

Outside the old camp, looking in from the new camp.

Standing outside the Death Gate at Stutthof Concentration Camp.
